Tutorial 01 — Lineage and Shared Pool
Prerequisites: iSVN 0.1.0-internal (fcf6302) is already installed, and a matching Demo Kit v3 practice project and learner workspace have already been initialized and verified. The project must contain the six versions listed below. These steps apply only to that version and dataset. Without the matching environment, read this as a conceptual walkthrough; do not apply it to a real team project.
Applies to iSVN 0.1.0-internal (commit
fcf6302) with Demo Kit v3. Screens and command output may differ in other versions.
Who this is for: IC design and CAD engineers who know basic Linux and design flows and are meeting iSVN for the first time.
What you will do: start from a real debugging question, find the correct upstream version from iSVN's recorded lineage, check out exactly that version, open it for work, and read its files. Then you will learn what the LINKED label means, how the Project File Cache Pool helps, and how to make a file editable and undo it.
Time: about 30 minutes.
How to read this guide
- Each hands-on step follows the same order: Purpose → Prerequisites → Where → Action → Expected result → How to verify → If it differs.
- Figures are marked as one of two kinds:
- Real capture: an actual iSVN interface screen. Step 3.1 switches the GUI to English to match the figures and labels in this guide.
- Teaching illustration: a diagram that explains an idea, not a product screen.
- Orange and teal outlines on real captures were added for this guide to show where to look. Nothing else in the screenshots was changed.
- Version IDs follow the structure
<phase>/<block>/<stage>/<version>, for exampletrial/cpu/200_fe_datain/v2. In speech,feis Front-End anddatainis Data-In, so200_fe_datain/v2is said "Front-End Data-In v2".
Contents
- The challenge
- Before you begin
- Prepare the demo project
- Trace the lineage
- Select and Checkout
- Set Active and inspect Work
- Why the Project File Cache Pool helps
- Working with editable files
- Flow context and limits
- Recap and quick checks
- Appendix A · Troubleshooting
- Appendix B · Glossary
- Appendix C · Command-line Checkout (optional)
- Appendix D · Sources, versions and limits
1. The challenge
You are asked to review a layout data input, trial/cpu/400_layout_datain/v1, because something went wrong in APR/layout. To debug it you need the front-end data input it was actually built from.
The version list offers two front-end candidates, 200_fe_datain/v2 and 200_fe_datain/v3. The habit of "take the biggest number" says v3. In IC design, though, every ECO or customer revision can start a new path of stage versions. A higher version number only means "created later", not "upstream of the thing I am debugging".
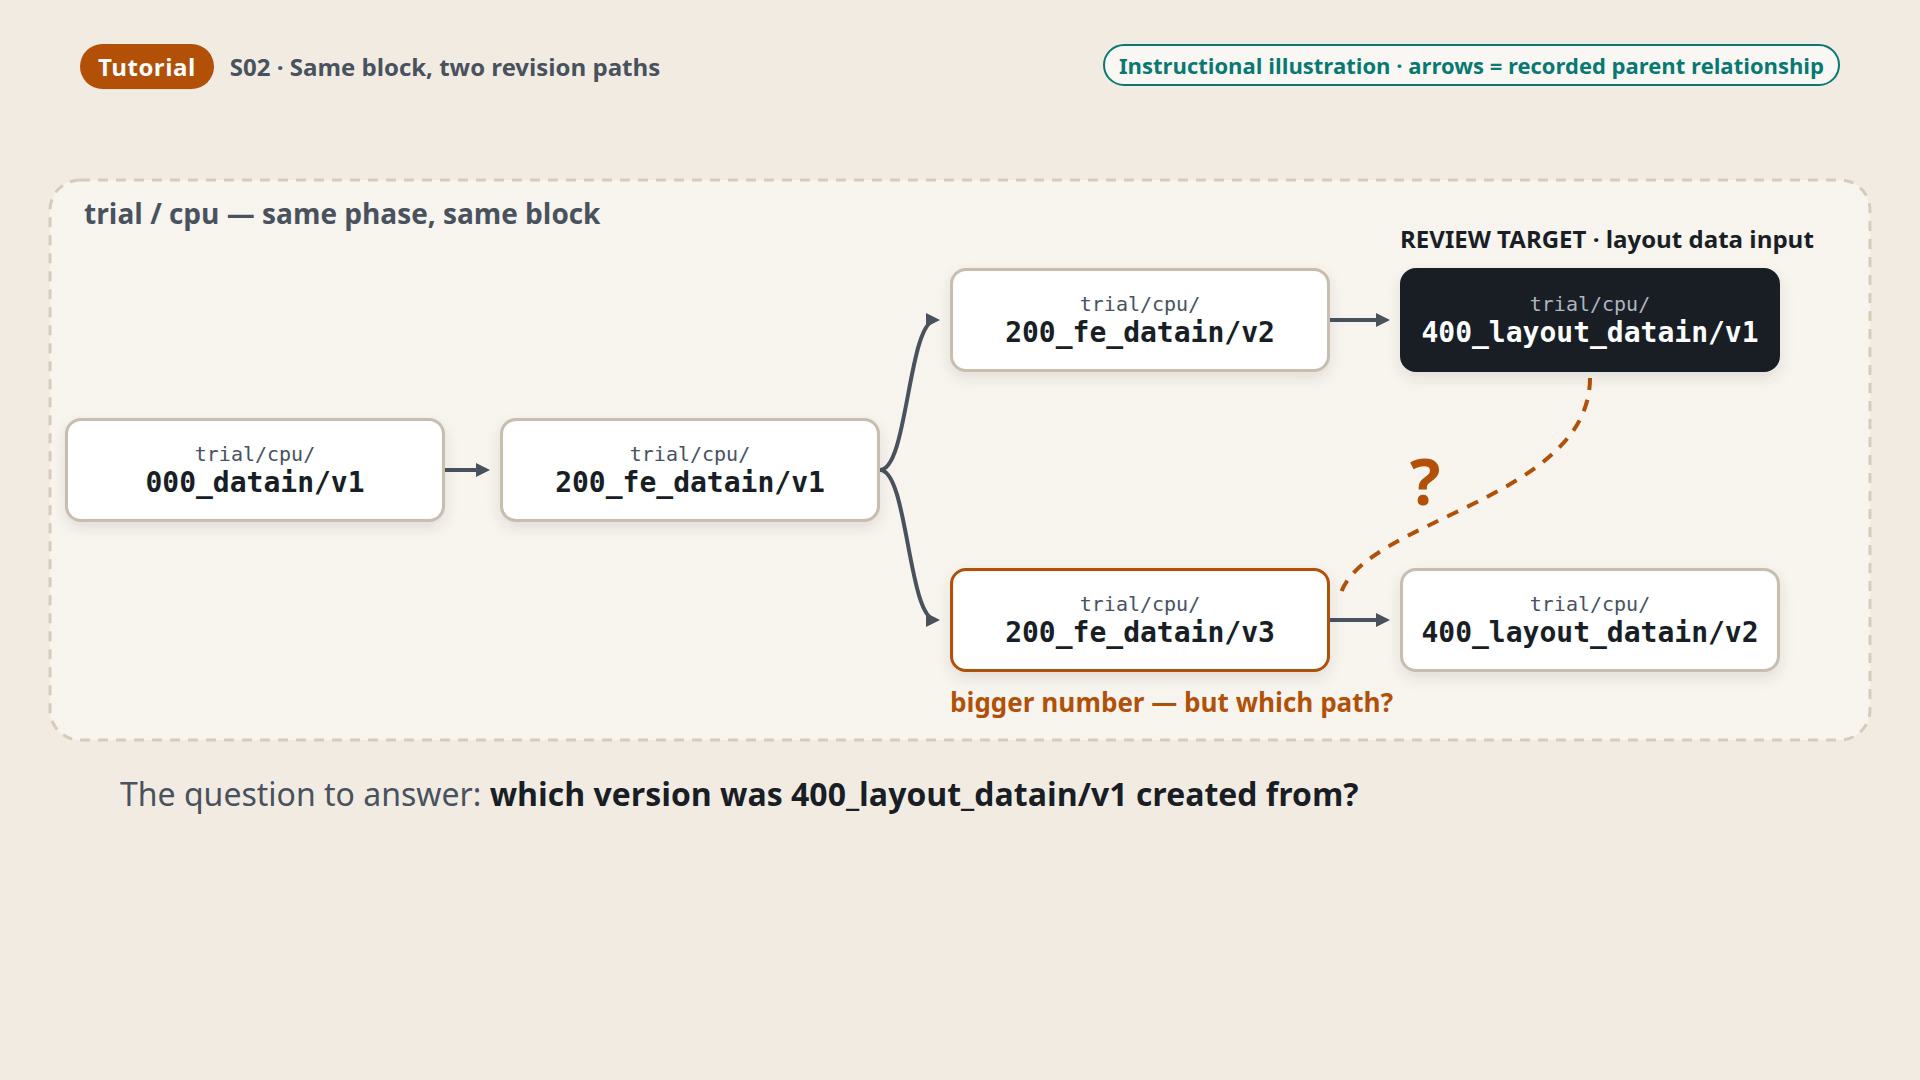
Figure F01 · Teaching illustration. Arrows are recorded parent relationships. The review target 400_layout_datain/v1 was created from 200_fe_datain/v2. The dashed question mark is the tempting assumption that the higher-numbered 200_fe_datain/v3 is its source; v3 is on the other path.
iSVN records, for every version, the version it was created from. This recorded lineage answers the question directly, so you do not have to guess from version numbers, folder names or timestamps.
2. Before you begin
What you need
| Item | Detail |
|---|---|
| Computer | Linux x86_64 with glibc 2.34 or newer (targets: Ubuntu 24.04, Rocky Linux 9), and a graphical desktop session for the GUI |
| Qt | The Qt 6.7.3 gcc_64 installation that Terminux uses. iSVN does not ship its own Qt; it links to this one. |
| iSVN package | isvn-0.1.0-internal-fcf6302-linux-x86_64.tar.gz |
| Demo Kit | isvn-demo-kit-tut01-v3-0.1.0-internal.tar.gz, which builds the practice project |
| Other | python3 (used by the Demo Kit). No root access and no Subversion installation are needed, because the package brings its own Subversion tools. |
Step 2.1 · Check the installation
- Purpose: confirm that iSVN, its bundled Subversion tools and the shared Qt all work before you use the prepared demo dataset.
- Prerequisites: The matching iSVN 0.1.0-internal (fcf6302) is installed. The checks below must end with
Ready.and report the matching version; otherwise STOP and do not proceed. - Where: the same terminal (any folder).
- Action:
ISVN_HOME="$HOME/.local/opt/isvn/current"
"$ISVN_HOME/isvn-preflight"
"$ISVN_HOME/isvn" version
- Expected result:
isvn-preflightprintsOKlines for the CLI and the bundledsvn,svnadminandsvnmucc, then the Qt check, and ends withReady.;isvn versionprintsisvn 0.1.0-internalandcommit: fcf6302.
- How to verify: the last preflight line is
Ready. - If it differs:
- A
WARN no DISPLAYline only means this terminal has no graphical session; the CLI still works, but open the GUI later from a desktop terminal. - Any other warning or failure: stop here and send the full output to your iSVN contact.
- A
3. Prepare the demo project
The already prepared Demo Kit v3 practice dataset contains:
- a local Subversion repository;
- an iSVN project with six versions of a CPU block and their recorded parents;
- an empty learner workspace for you.
All design files are synthetic teaching material.
Step 3.1 · Open the iSVN GUI and switch it to English
- Purpose: start the GUI where iSVN knows your workspace and project, and show it in English.
- Prerequisites: The matching Demo Kit v3 practice project is initialized and verified, with the six versions listed below and its learner workspace. Preflight in Step 2.1 ended with
Ready.and the version matched 0.1.0-internal (fcf6302). Use a terminal inside your graphical desktop. - Where: the learner workspace folder,
~/isvn_demo/learner-workspace. - Action: start the GUI from the learner workspace. When the window opens, switch the interface to English with the language button at the top right, as described below.
ISVN_HOME="$HOME/.local/opt/isvn/current"
cd "$HOME/isvn_demo/learner-workspace"
"$ISVN_HOME/isvn-gui"
- Expected result:
- the window opens on the Work page in Traditional Chinese. The GUI starts in Traditional Chinese every time it opens;
- the language button at the top right reads 繁體中文. Each click moves to the next language, 繁體中文 → 简体中文 → English, so click it twice;
- Work then reads No local working versions and Check out a version to begin, then Refresh, because nothing has been checked out yet.
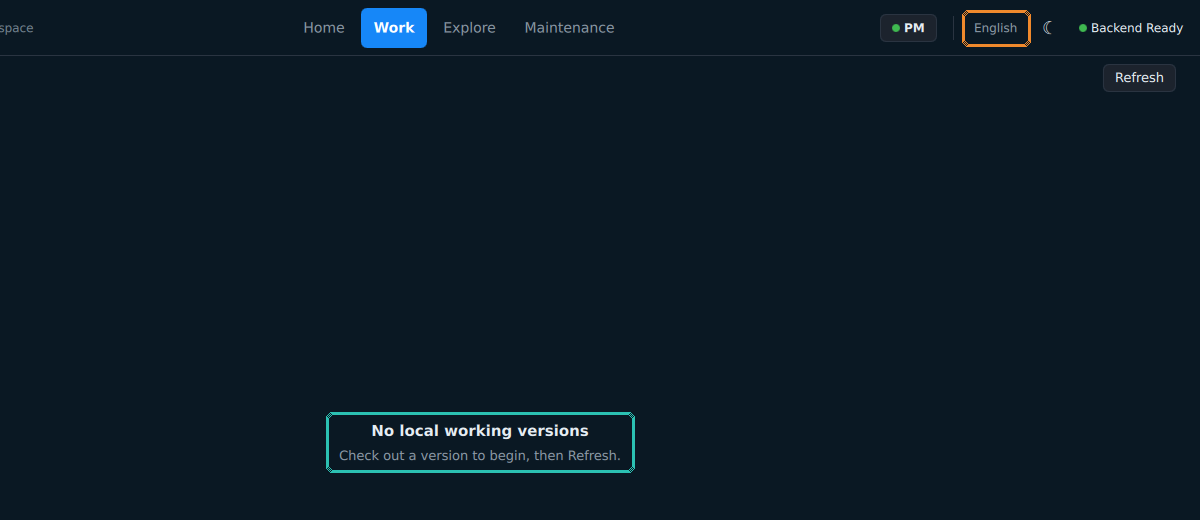
Figure F02 · Real capture, after the language switch. The language button (orange) now reads English. The teal outline marks the empty-state message No local working versions.
- How to verify: the top bar shows the tabs Home, Work, Explore and Maintenance, the language button reads English, and Work shows the empty-state message.
- If it differs:
- If the GUI shows another project, close it and start it again from
~/isvn_demo/learner-workspace; the GUI uses the folder it was started from. - If it exits at once with An existing GUI endpoint could not be authenticated, see Appendix A.
- If the GUI shows another project, close it and start it again from
Step 3.2 · List the versions
- Purpose: see every version of the block before you choose one.
- Prerequisites: Select the matching, initialized and verified Demo Kit v3 learner workspace. Keep the GUI open and use a second terminal.
- Where: the learner workspace,
~/isvn_demo/learner-workspace. A new terminal does not remember variables, so the block sets them again. - Action:
ISVN_HOME="$HOME/.local/opt/isvn/current"
cd "$HOME/isvn_demo/learner-workspace"
"$ISVN_HOME/isvn" branches
- Expected result: six versions, all in the same phase (
trial) and block (cpu):
trial/cpu/000_datain/v1
trial/cpu/200_fe_datain/v1
trial/cpu/200_fe_datain/v2
trial/cpu/200_fe_datain/v3
trial/cpu/400_layout_datain/v1
trial/cpu/400_layout_datain/v2
The same six appear in the GUI. In Explore, click Choose version:
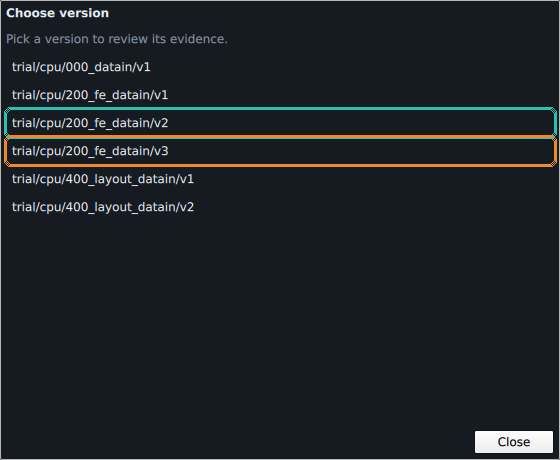
Figure F03 · Real capture. The version picker lists the versions by path. 200_fe_datain/v2 (teal) and the higher-numbered v3 (orange) sit side by side; nothing marks either one as "latest" or "right".
- How to verify: both lists contain exactly these six IDs. After several ECO changes,
200_fe_datainhas v2 and v3, and400_layout_datainhas v1 and v2. - STOP: confirm that the practice project matches Demo Kit v3 before proceeding.
If you opened the picker, close it (Close) for now. Chapter 5 uses it.
4. Trace the lineage
The task is to review 400_layout_datain/v1, so you need the front-end input it was built from, which is not necessarily the one with the biggest number. Ask iSVN.
Step 4.1 · Ask for the ancestry of the review target
- Purpose: read the parent chain that iSVN recorded when each version was created.
- Prerequisites: the second terminal from Step 3.2.
- Where:
~/isvn_demo/learner-workspace(same terminal, variables already set). - Action:
"$ISVN_HOME/isvn" ancestry trial/cpu/400_layout_datain/v1
- Expected result:
trial/cpu/400_layout_datain/v1
  <- trial/cpu/200_fe_datain/v2
  <- trial/cpu/200_fe_datain/v1
  <- trial/cpu/000_datain/v1
- How to verify: the first parent under
400_layout_datain/v1is200_fe_datain/v2. - If it differs: if the command reports an unknown version, check the spelling against the
brancheslist. IDs are case-sensitive and use underscores.
Step 4.2 · Compare with the other layout input
- Purpose: see where
200_fe_datain/v3really belongs. - Prerequisites: Step 4.1.
- Where: the same terminal.
- Action:
"$ISVN_HOME/isvn" ancestry trial/cpu/400_layout_datain/v2
- Expected result:
trial/cpu/400_layout_datain/v2
  <- trial/cpu/200_fe_datain/v3
  <- trial/cpu/200_fe_datain/v1
  <- trial/cpu/000_datain/v1
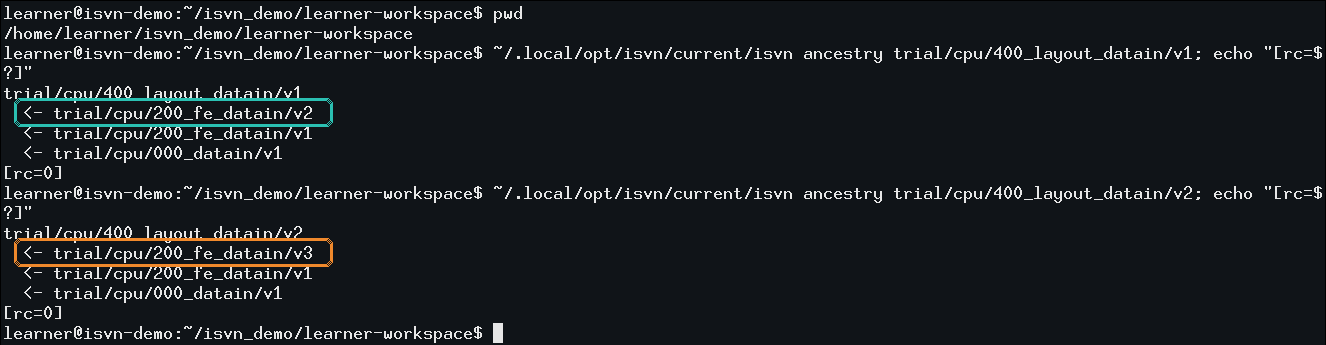
Figure F04 · Real terminal. The recorded session ran the same two commands with the full path ~/.local/opt/isvn/current/isvn and an extra echo "[rc=$?]". 400_layout_datain/v1 comes from 200_fe_datain/v2 (teal); 400_layout_datain/v2 comes from 200_fe_datain/v3 (orange).
- How to verify:
200_fe_datain/v3appears only in the chain of400_layout_datain/v2. - If it differs: see Step 4.1.
What this tells you
200_fe_datain/v3has the bigger number, but it is on the other path; it is not upstream of400_layout_datain/v1.- The version to review is
200_fe_datain/v2. - Both paths start from
200_fe_datain/v1, which is where the two ECO directions split. - Lineage here means the parent chain recorded when each version was created. It is not inferred from names, numbers or dates.
5. Select and Checkout
Selecting a version and checking it out are two different actions in the GUI. Selecting only shows a version; Checkout brings it into your workspace.
Step 5.1 · Select 200_fe_datain/v2 in Explore
- Purpose: open the correct version for viewing before you take a copy of it.
- Prerequisites: Chapter 4 told you the version is
trial/cpu/200_fe_datain/v2. - Where: GUI → Explore.
- Action: click Choose version, then click
trial/cpu/200_fe_datain/v2in the list. - Expected result:
- the field Inspected Version shows
trial/cpu/200_fe_datain/v2; - a notice explains: This version is not in this workspace. Checkout creates its local working copy only; it does not change the Active version.
- the field Inspected Version shows

Figure F05 · Real capture. 200_fe_datain/v2 is the inspected version (teal), and the notice (orange) says Checkout only creates its local working copy without changing the Active version. Nothing has been checked out yet.
- How to verify: the top right now offers Checkout…. Your learner workspace still contains no version folder.
- If it differs: if a different version is shown, open Choose version again and pick the
200_fe_datain/v2row (not v3).
Step 5.2 · Check out v2
- Purpose: bring exactly one version,
200_fe_datain/v2, into your workspace as a working copy. - Prerequisites: Step 5.1; v2 is the inspected version.
- Where: GUI → Explore, top right.
- Action: click Checkout…, read the dialog, then click Checkout in the dialog. Clicking Cancel instead leaves everything unchanged.
- Expected result:
- the dialog Checkout version asks Check out this version into your workspace? and names the version
trial/cpu/200_fe_datain/v2and the local folder…/learner-workspace/trial/cpu/200_fe_datain/v2; - it also says only this version is checked out and the Active version does not change; you use Set Active and Open Work afterwards;
- after you confirm, a notice reports the checkout and repeats that the Active version is unchanged.
- the dialog Checkout version asks Check out this version into your workspace? and names the version
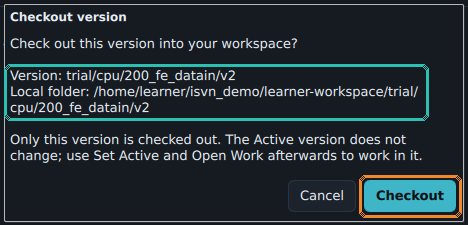
Figure F06 · Real capture. The confirmation that Checkout… opens. It names the version and the folder it will create (teal). Checkout in the dialog (orange) checks out exactly this one version.
- How to verify: continue with Step 6.1 on the Work page.
- If it differs: if the dialog names another version, click Cancel and repeat Step 5.1.
6. Set Active and inspect Work
A working copy on disk is not yet "the version you are working on". In iSVN the version you work on is the active version, and you choose it explicitly with Set Active.
Step 6.1 · Confirm that Checkout did not change the active version
- Purpose: see the difference between checked out and active.
- Prerequisites: Step 5.2.
- Where: GUI → Work.
- Action: click the Work tab.
- Expected result:
- under Local Working Versions,
v2(trial / cpu / 200_fe_datain) is listed as clean; the card shortens the word to cle…; - the header ACTIVE WORKING VERSION still says No active version, and the file list is empty.
- under Local Working Versions,
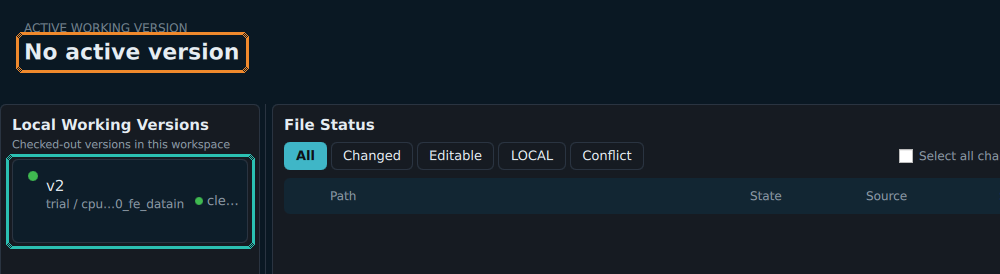
Figure F07 · Real capture. v2 is now a local working version (teal), but there is still no active version (orange) and no file list. Checkout is not Set Active.
- How to verify: the header reads No active version.
- If it differs: if
v2is not listed, Checkout did not run; go back to Step 5.2.
Step 6.2 · Set v2 active
- Purpose: tell iSVN that
200_fe_datain/v2is the version you are now working on. - Prerequisites: Step 6.1.
- Where: GUI → Explore, top right, with
200_fe_datain/v2still the inspected version. - Action: click Set Active and Open Work.
- Expected result: the GUI switches to Work and opens v2 there (Step 6.3).

Figure F08 · Real capture. Back in Explore, the notice (teal) confirms the checkout into the learner workspace and that the Active version is unchanged. The control to press is Set Active and Open Work, outlined orange.
- How to verify: continue with Step 6.3.
- If it differs: if the button is not there, check that the inspected version is still
trial/cpu/200_fe_datain/v2(Step 5.1).
Step 6.3 · Read the four LINKED files in Work
- Purpose: confirm that the active version is the one you chose, and see its files.
- Prerequisites: Step 6.2.
- Where: GUI → Work (opened automatically).
- Action: read the header and the File Status list.
- Expected result:
- the header ACTIVE WORKING VERSION shows trial / cpu / 200_fe_datain / v2;
- the file list shows four files: the README, the timing constraints, the design spec and the RTL. Each is Clean, with source LINKED:
| Path | State | Source | Size |
|---|---|---|---|
README.md |
Clean | LINKED | 270 B |
constraints.sdc |
Clean | LINKED | 239 B |
design_spec.md |
Clean | LINKED | 379 B |
top.v |
Clean | LINKED | 383 B |
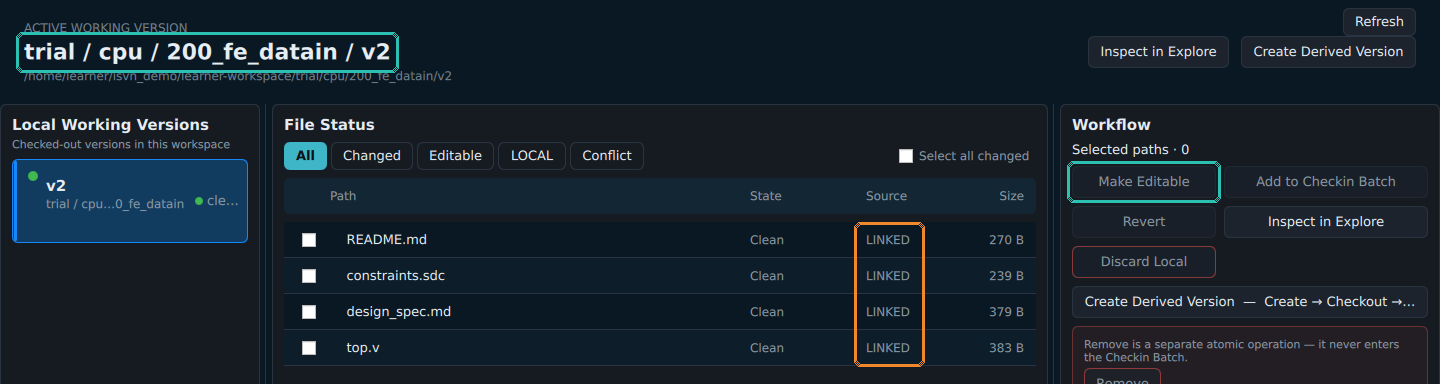
Figure F09 · Real capture. The active version (teal, top left) and the four clean files with source LINKED (orange). The Workflow panel on the right holds the Make Editable control (teal); Chapter 8 uses it.
- How to verify: the header names
200_fe_datain / v2, and all four files show LINKED. - If it differs:
- If the header still says No active version, Set Active did not complete; repeat Step 6.2.
- If you see different files or sizes, check that you selected v2, not v3.
Step 6.4 · Read top.v in a terminal
- Purpose: confirm with your own eyes that the files are the design data you need to review.
- Prerequisites: Step 6.3; the second terminal, in the learner workspace.
- Where:
~/isvn_demo/learner-workspace. - Action:
cat trial/cpu/200_fe_datain/v2/top.v
- Expected result: the v2 RTL, a 4-bit counter with an
en(enable) input:
// demo_counter: 4-bit counter with synchronous enable (synthetic tutorial example).
module top (
    input  wire       clk,
    input  wire       rst_n,
    input  wire       en,
    output reg  [3:0] count
);

    always @(posedge clk or negedge rst_n) begin
        if (!rst_n)
            count <= 4'd0;
        else if (en)
            count <= count + 4'd1;
    end

endmodule
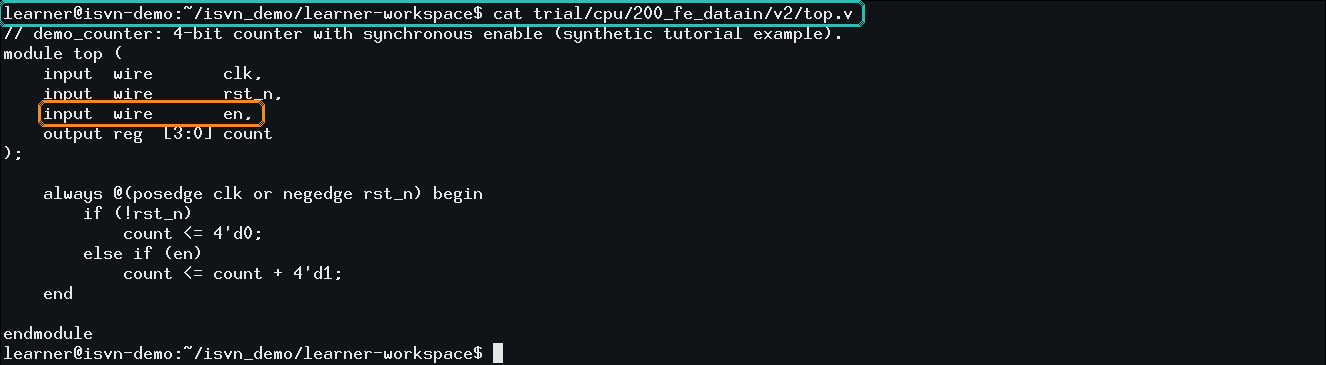
Figure F10 · Real terminal, in the learner workspace. The command (teal) and the en input of the v2 design (orange).
- How to verify: the file contains
input wire en,. - If it differs: No such file or directory means you are not in the learner workspace (run
cd "$HOME/isvn_demo/learner-workspace") or the checkout did not happen (Step 5.2).
You found the right upstream version by lineage, checked out only that version, made it active, and read its files.
7. Why the Project File Cache Pool helps
The four files in Step 6.3 were marked LINKED. In a large IC design project, many stage versions share the same file content, such as the same RTL, constraints or specification carried from one version into the next. Without help, every working copy of every version holds its own copy of each of those files.
iSVN can keep one read-only copy of a given working-file content in the project's Project File Cache Pool. A LINKED file in your working copy points at that shared, read-only content instead of being a separate copy.
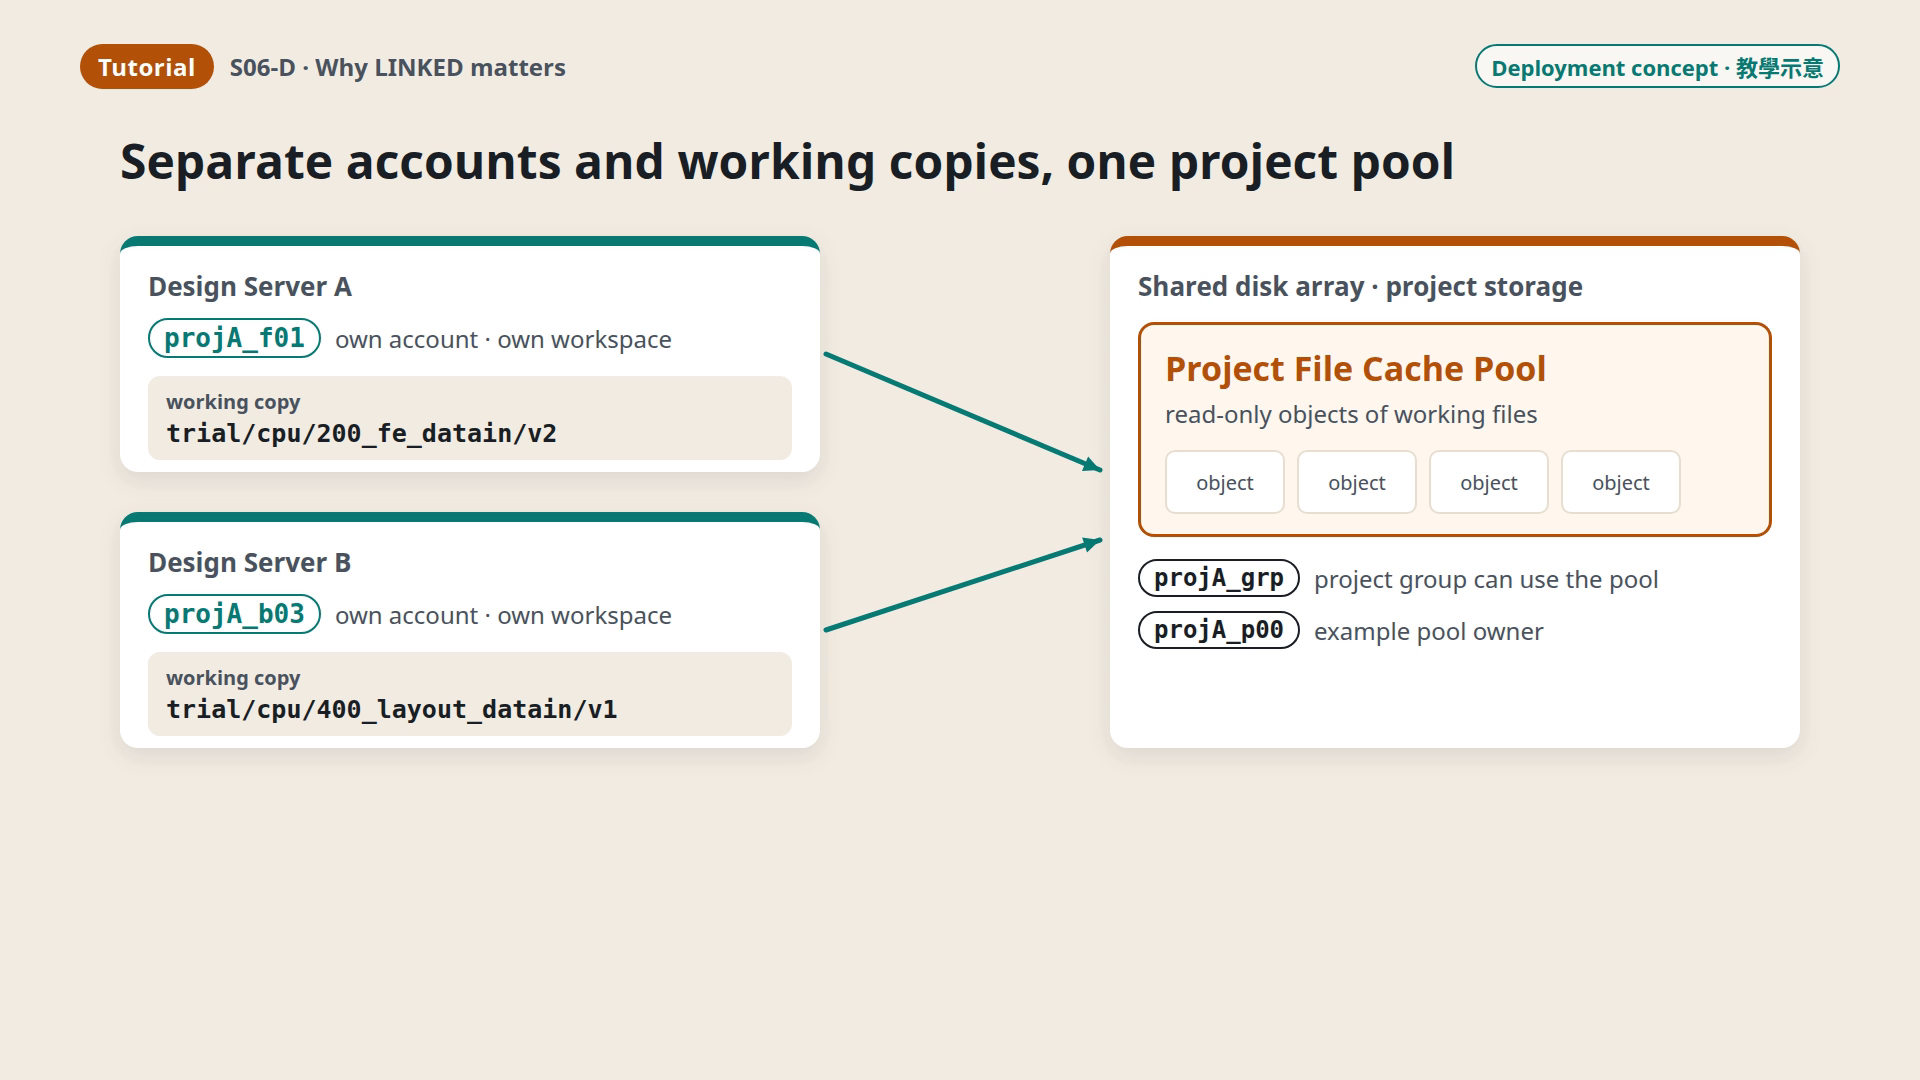
Figure F11 · Deployment concept (labelled 教學示意, teaching illustration). Engineers keep separate accounts and working copies, and members of the same project group use one pool on shared project storage. projA_f01, projA_b03, projA_grp and the example pool owner projA_p00 are example names, not required accounts. Use across several servers is a target deployment and has not been verified.
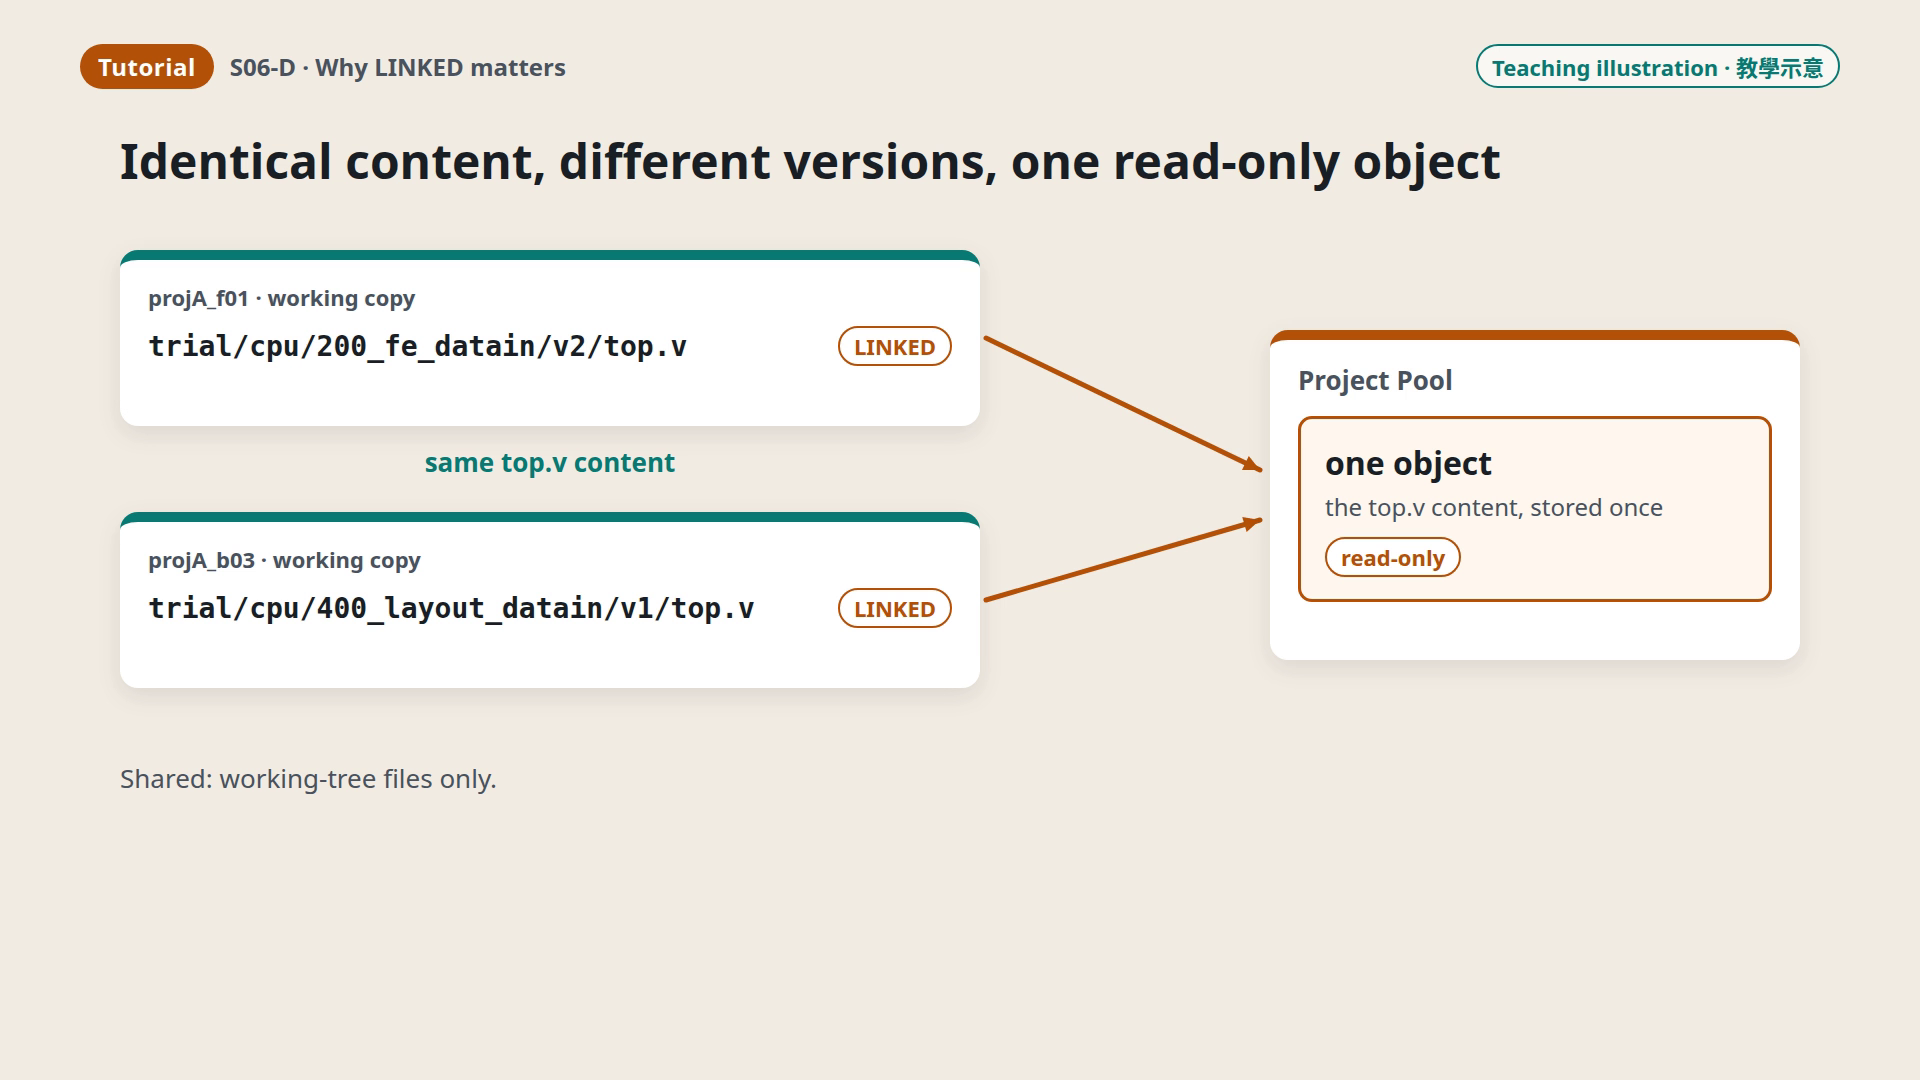
Figure F12 · Teaching illustration. 200_fe_datain/v2/top.v and 400_layout_datain/v1/top.v have identical content (in the demo, layout v1 inherited top.v unchanged from fe v2), so both LINKED files point to one read-only object. Only working-tree files are shared.
What this does and does not mean:
- It reduces duplicate working files: identical, unmodified working-file content is stored once.
- Each engineer still has their own working copy, and Subversion still keeps its own working-copy data (
.svn/pristine) for every working copy. Checkout still fetches data from Subversion. - It does not deduplicate the Subversion repository, it does not mean "zero download", and no saving percentage has been measured for this guide.
- Shown versus verified:
- the real screens in this guide come from single-account sessions;
- several engineers sharing one pool is shown here as a concept;
- several servers sharing one pool has not been verified.
8. Working with editable files
A LINKED file points at a shared, read-only object, so you do not edit it in place. When you need to change a file, you ask for your own copy first.
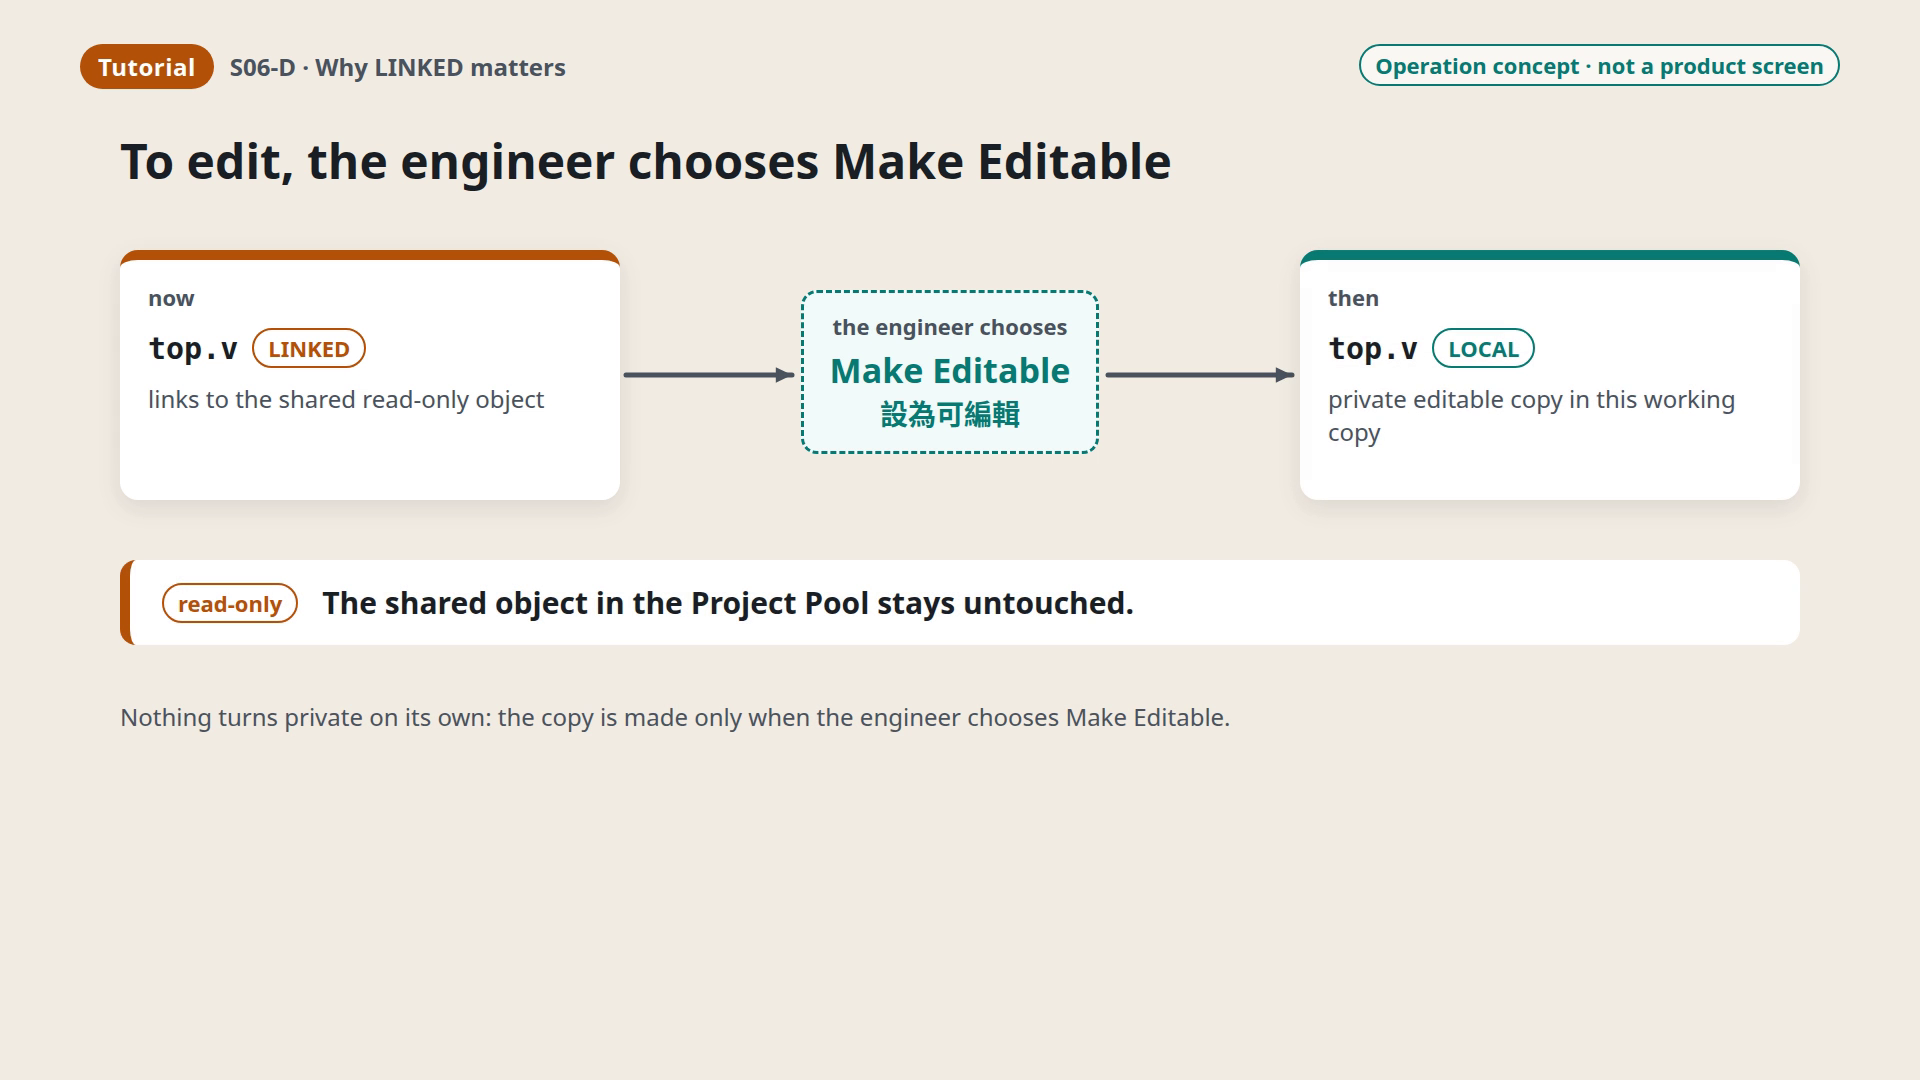
Figure F13 · Operation concept, not a product screen. The engineer chooses Make Editable; iSVN creates a private LOCAL copy in that working copy, and the shared read-only object stays unchanged. Nothing becomes editable on its own.
- The rule: nothing becomes editable or private on its own. iSVN makes the private copy only when you choose Make Editable for the file.
- What happens: the file's source changes from LINKED to LOCAL, a private editable copy in your working copy. No repository revision is created, and the object in the Project Pool is not modified, so other working copies that link to the same content are not affected.
- Try it: Steps 8.1 and 8.2 are optional. They make
top.veditable and then return it to LINKED, so your working copy ends as it was after Step 6.3. They change only your own working copy, never the repository.
Step 8.1 · Make top.v editable (optional)
- Purpose: see a LINKED file become your own LOCAL copy.
- Prerequisites: Step 6.3; Work shows
trial / cpu / 200_fe_datain / v2as the active version. - Where: GUI → Work: the File Status list and the Workflow panel.
- Action: tick the box in front of
top.v, click Make Editable in the Workflow panel, then click Apply on the confirmation screen. When the result screen appears, click Done.
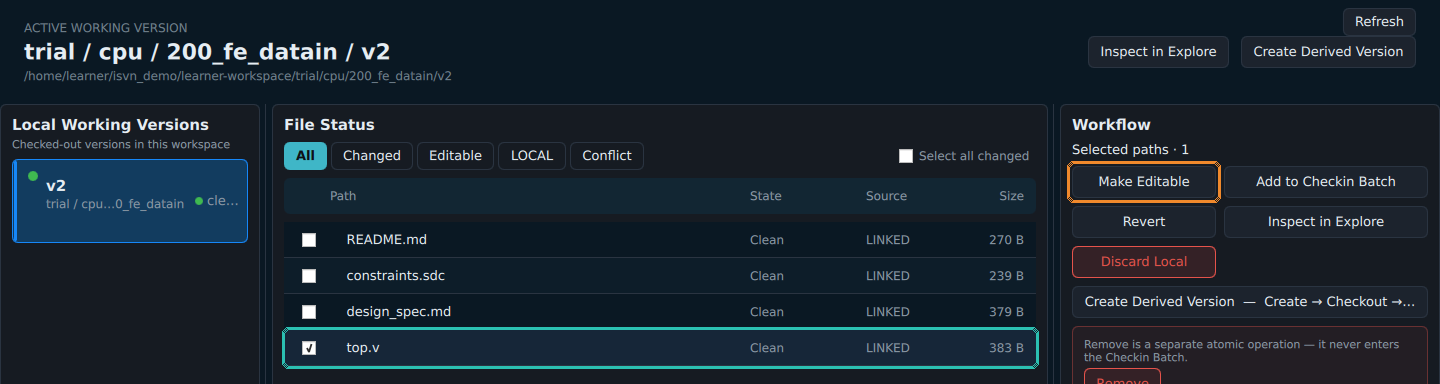
Figure F14 · Real capture. top.v is ticked (teal), the Workflow panel counts Selected paths · 1, and Make Editable (orange) is now available.
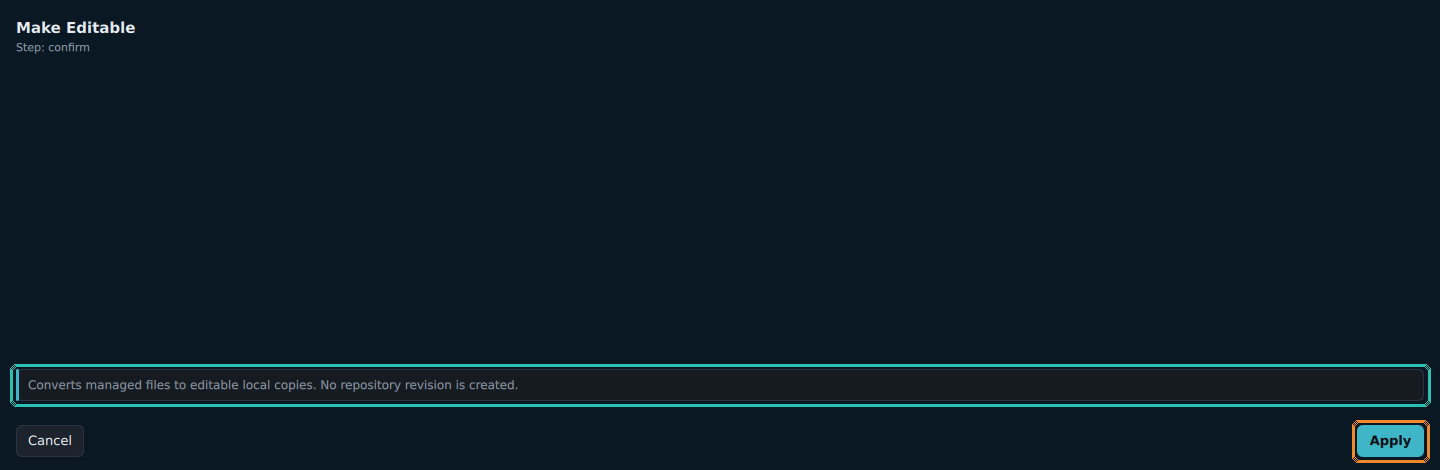
Figure F15 · Real capture. The confirmation screen Make Editable says: Converts managed files to editable local copies. No repository revision is created. Apply (orange) carries it out; Cancel leaves the file unchanged. The screen does not list file names, so check your selection before you click.
- Expected result:
- the result screen reads Completed and No repository revision was created;
- after Done, Work shows
top.vwith state Editable and source LOCAL, still 383 B; the header adds 1 changed and 1 LOCAL; - the other three files stay Clean and LINKED.
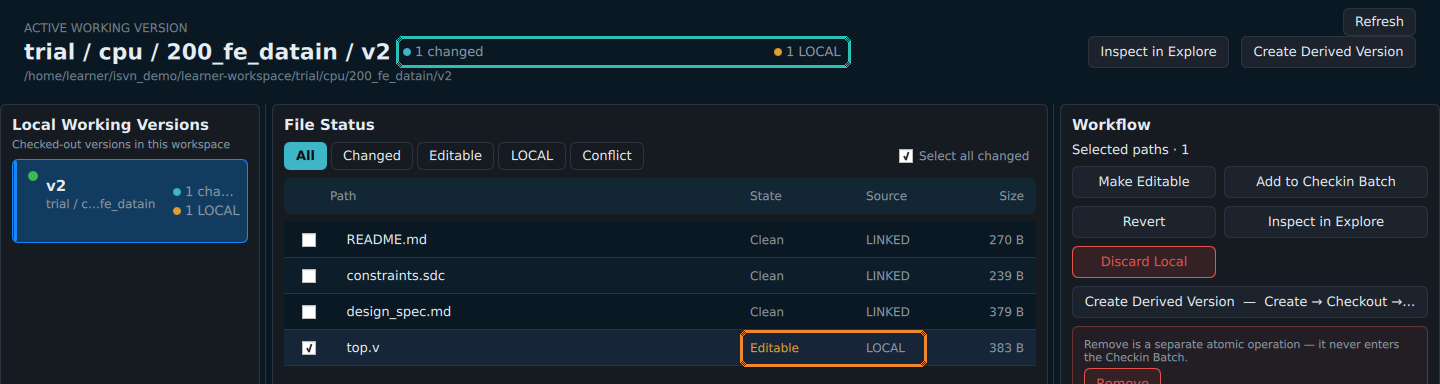
Figure F16 · Real capture. top.v is now Editable and LOCAL (orange); the header counts one changed and one LOCAL file (teal). The other three files are still LINKED.
- How to verify: the Source column reads LOCAL for
top.vand LINKED for the other three files. - If it differs:
- If Make Editable stays greyed out, no file is ticked (Selected paths · 0).
- If you clicked Cancel, nothing changed; start this step again.
Step 8.2 · Return top.v to LINKED (optional)
- Purpose: undo Step 8.1, so your working copy is again as it was after Step 6.3.
- Prerequisites: Step 8.1;
top.vis still ticked. - Where: GUI → Work, Workflow panel.
- Action: click Revert. The confirmation screen warns This discards local changes: Restores the managed state and discards local edits. No repository revision is created. If you changed
top.vand want to keep the change, click Cancel here. Otherwise click Apply, then Done on the result screen. - Expected result:
top.vis back to Clean and LINKED, and the header no longer shows 1 changed or 1 LOCAL. - How to verify: all four files show LINKED again, as in Figure F09.
- If it differs: if
top.vstill shows LOCAL, check that it is ticked and repeat this step.
9. Flow context and limits
Lineage matters even more inside a design flow. A flow run may read RTL, constraints and other data from several stages at once. If one of them comes from another ECO or customer path, the run may still finish, while its result rests on the wrong combination of data.
iSVN records where each version came from. Put next to a record of what a flow actually read, for example from Terminux, the two can be compared, so an engineer can notice a mismatch that is worth checking.
Concept only. This chapter presents an integration concept. This guide does not claim that iSVN, or iSVN together with Terminux, automatically detects mixed flow inputs. Today you compare the records yourself, using
isvn ancestryas shown in Chapter 4.
10. Recap and quick checks
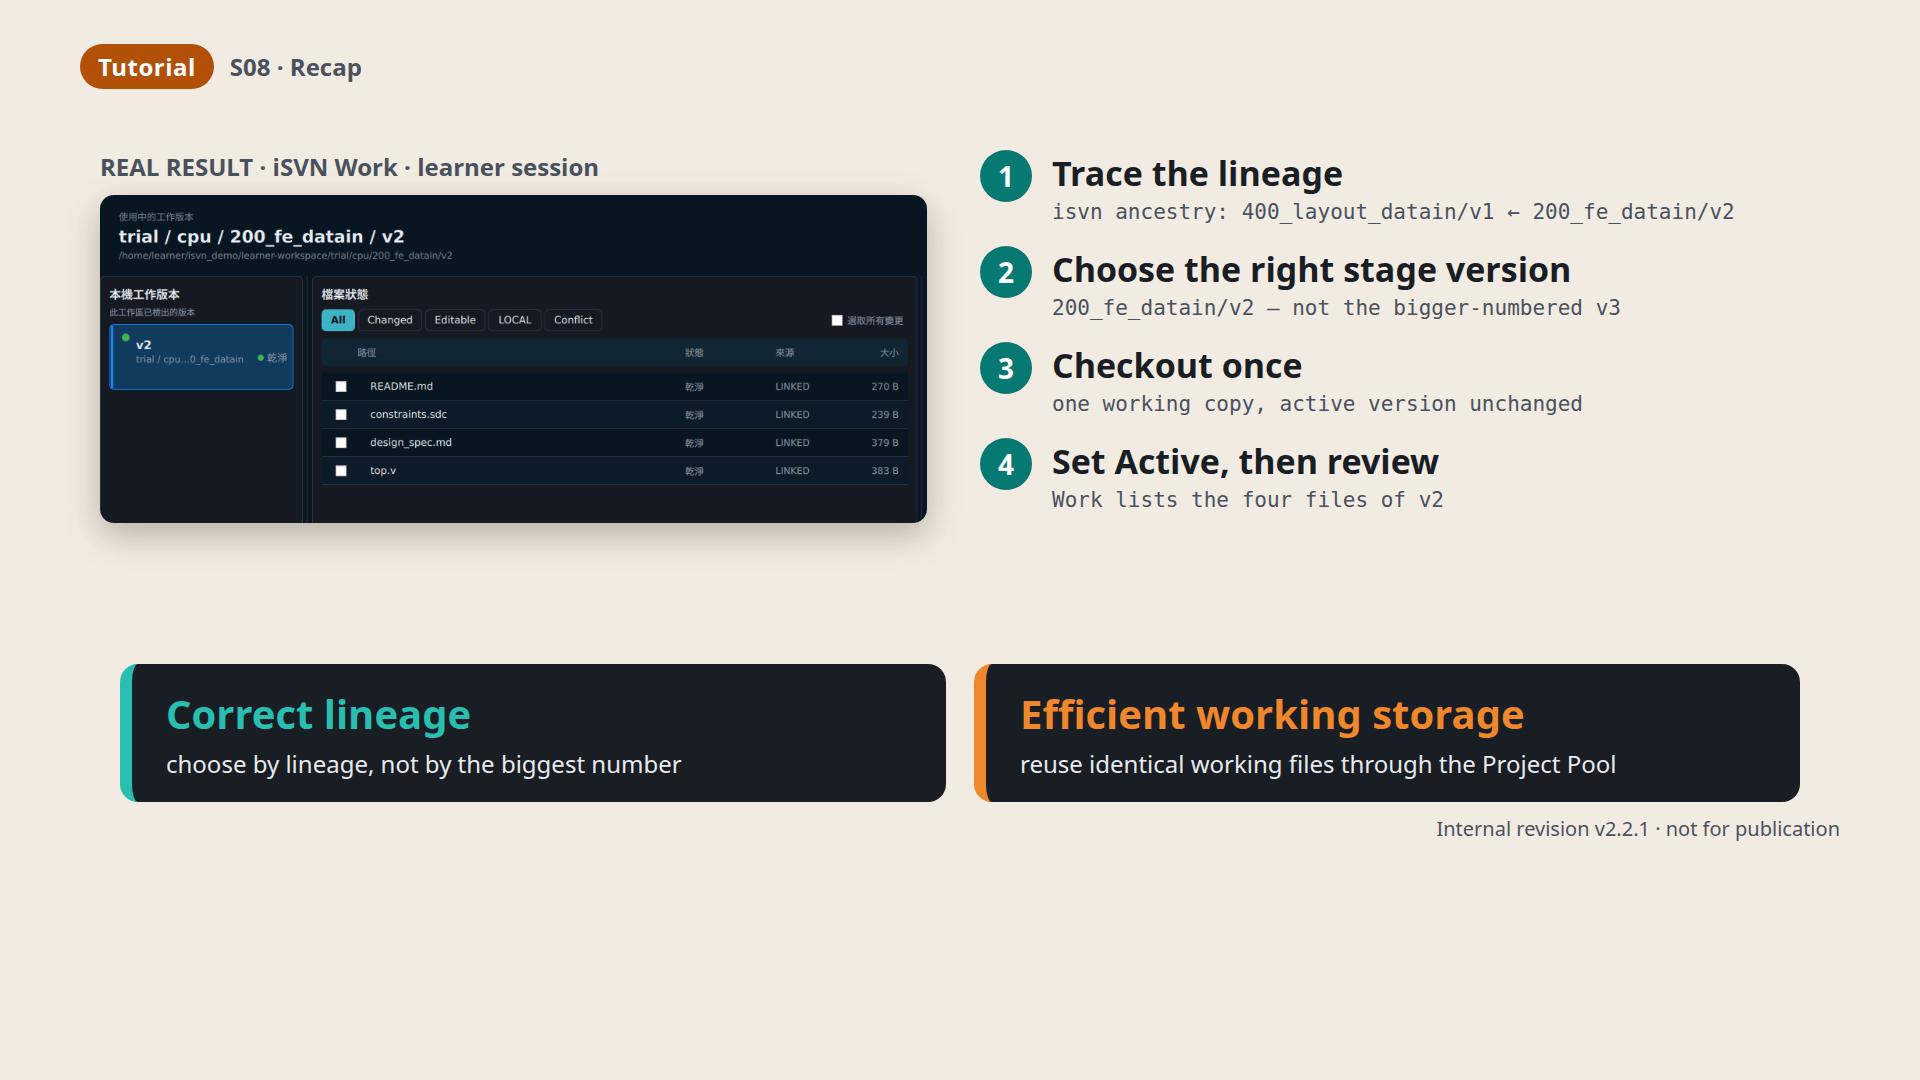
Figure F17 · Recap card.
The four steps:
- Trace the lineage:
isvn ancestry trial/cpu/400_layout_datain/v1leads to200_fe_datain/v2. - Choose the right stage version:
200_fe_datain/v2, not the bigger-numbered v3. - Checkout once: one working copy; the active version is unchanged.
- Set Active, then review: Work lists the four files of v2.
The two takeaways:
- Correct lineage: choose by lineage, not by the biggest number.
- Efficient working storage: reuse identical working files through the Project Pool.
Quick self-check
| Question | Where to look | Expected answer |
|---|---|---|
Which version was 400_layout_datain/v1 built from? |
isvn ancestry trial/cpu/400_layout_datain/v1 |
trial/cpu/200_fe_datain/v2 |
| Is v3 upstream of the review target? | isvn ancestry of both layout inputs |
No, v3 is upstream of 400_layout_datain/v2 |
| Did Checkout change the active version? | Work after Checkout | No, it said No active version |
| Which version is active now? | Work header | trial / cpu / 200_fe_datain / v2 |
| What is the source of the four files? | Work, File Status list, Source column | LINKED |
| How do I get an editable copy? | Work, Workflow panel | Tick the file and choose Make Editable; it becomes LOCAL (Step 8.1) |
| How do I return it to LINKED? | Work, Workflow panel | Revert; this discards local edits to that file (Step 8.2) |
Appendix A · Troubleshooting
| What you see | Likely cause | Safe next step |
|---|---|---|
| isvn-preflight does not end with Ready., or the version is not 0.1.0-internal (fcf6302) | Dependencies or the installed version do not match this walkthrough | STOP: keep the preflight output and ask your administrator to confirm the installed version and Qt 6.7.3. Do not proceed without the matching prerequisites. |
isvn-preflight does not end with Ready. |
missing system library or Qt problem | Keep the output and contact your iSVN contact; do not continue |
| GUI exits with An existing GUI endpoint could not be authenticated | the runtime folder path (XDG_RUNTIME_DIR) is unusually long, as can happen in containers or test setups; a normal desktop session is not affected |
Start the GUI from a normal desktop terminal |
| GUI shows no versions or another project | the GUI was started outside the learner workspace | Close it and start it from ~/isvn_demo/learner-workspace |
| Work shows no files after Checkout | Set Active has not been done | Do Step 6.2 |
| The GUI is in Traditional Chinese again after you reopen it | the GUI always starts in Traditional Chinese | Click the language button twice (Step 3.1) |
| After you reopen the GUI, Work says No active version although v2 was active | on a new account, this version may not remember the active version between sessions | In Explore, choose trial/cpu/200_fe_datain/v2 again (it reports that the version is already in this workspace) and click Set Active and Open Work. Do not check it out again |
cat …/top.v: No such file or directory |
wrong folder, or no checkout yet | cd "$HOME/isvn_demo/learner-workspace"; check Step 5.2 |
| Version IDs differ from the six in Step 3.2 | the project was built from another Demo Kit | STOP: confirm that the prepared, initialized and verified Demo Kit v3 dataset contains the six versions listed in Step 3.2. Do not continue with a different dataset. |
Stay safe:
- This tutorial never needs administrative or destructive commands. Do not run
delete,gcoradmin initagainst a real project while following it. - If something unexpected happens, stop and keep the terminal output.
Appendix B · Glossary
| Term | Meaning in this guide |
|---|---|
| Version ID | <phase>/<block>/<stage>/<version>, for example trial/cpu/200_fe_datain/v2 |
datain, fe |
Data-In, Front-End; 200_fe_datain is the front-end data input stage, 400_layout_datain the layout data input stage |
| ECO | Engineering Change Order (said "E-C-O"); each ECO or customer revision can start a new path of versions |
| Lineage | The recorded chain of parent versions, set when each version is created |
isvn ancestry |
Prints the recorded lineage of a version |
| Explore | The GUI page for browsing versions and their lineage |
| Choose version | Opens the version picker in Explore |
| Checkout | Creates a local working copy of one version; it does not change the active version |
| Set Active and Open Work | Makes a checked-out version the one you work on, and opens it in Work |
| Active version | The version Work shows under ACTIVE WORKING VERSION and operates on |
| Working Copy | Your local copy of a version, inside your workspace |
| Work | The GUI page for the active version and its files |
| LINKED | A working file that points at a shared read-only object in the Project File Cache Pool |
| LOCAL | A private editable file in your working copy |
| Make Editable | The action that turns a LINKED file into your own LOCAL copy |
| Revert | Returns selected files to their managed state; discards local edits to them |
| Project File Cache Pool | Project storage that keeps one read-only copy of identical working-file content |
| Clean | No local changes |
Appendix C · Command-line Checkout (optional)
The command below creates the same working copy as the GUI Checkout in Step 5.2. If you prefer the terminal, run it instead of Step 5.2, in the second terminal from Step 3.2 (learner workspace, ISVN_HOME already set):
"$ISVN_HOME/isvn" checkout trial/cpu/200_fe_datain/v2
It prints checked out trial/cpu/200_fe_datain/v2 to …/learner-workspace/trial/cpu/200_fe_datain/v2. Like the GUI Checkout, it does not set the active version; do Step 6.2 in the GUI afterwards.
Appendix D · Sources, versions and limits
- Product shown:
- iSVN Portable 0.1.0-internal, commit
fcf6302, with Qt 6.7.3 shared from Terminux; - Demo Kit v3, with standard version IDs.
- iSVN Portable 0.1.0-internal, commit
- The fcf6302 build is not suitable for several accounts sharing one project. Cross-server use, high storage usage and migration of older pools are outside this walkthrough’s scope. The pool figures in Chapters 7 and 8 illustrate concepts.