User Manual
Audience: design team members who work with isvn every day. This manual is organized by "what I want to get done" and explains the GUI operations step by step. For the full description of every screen and every command, see the reference isvn User Guide; for installation, see the isvn Installation and Deployment Guide.
0. Before you start
You need:
- isvn already installed (the project installer, or the Portable evaluation build);
- a workspace (WORKSPACE_ROOT) created with
isvn member init; - at least one version in the project's repository.
A few terms you will always see:
| Term | Meaning |
|---|---|
| Version | A four-part ID, for example trial/cpu/200_fe_datain/v2. Each version is an SVN branch |
| Workspace | Your working directory. Each version you get is placed in its own WORKSPACE_ROOT/<phase>/<block>/<stage>/<version>/ |
| Active version | The version that the Work page is currently operating on |
| LINKED | The file is a link to shared read-only content; before you modify it you must first Make Editable |
| LOCAL | The file is a regular file in your working copy: a copy made editable, or a new file not yet checked in |
| Check in | Commit your changes to the repository, which creates a new revision |
The screenshots in this manual are taken from the demo project of the TUT01 Demo Kit (account learner). The screenshots in this English manual use the English interface; the screenshots of the Chinese interface are in the Chinese version.
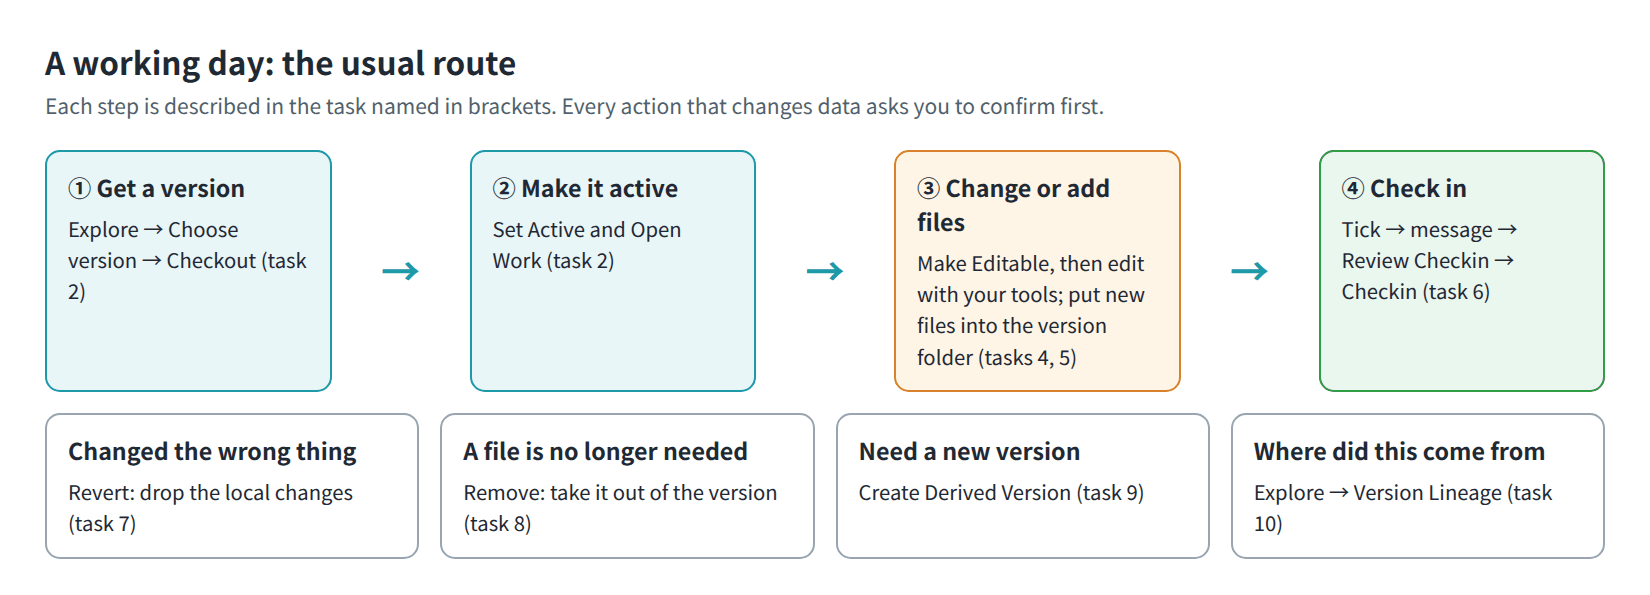
Figure M-01. A working day: the usual route and the task that covers each step.
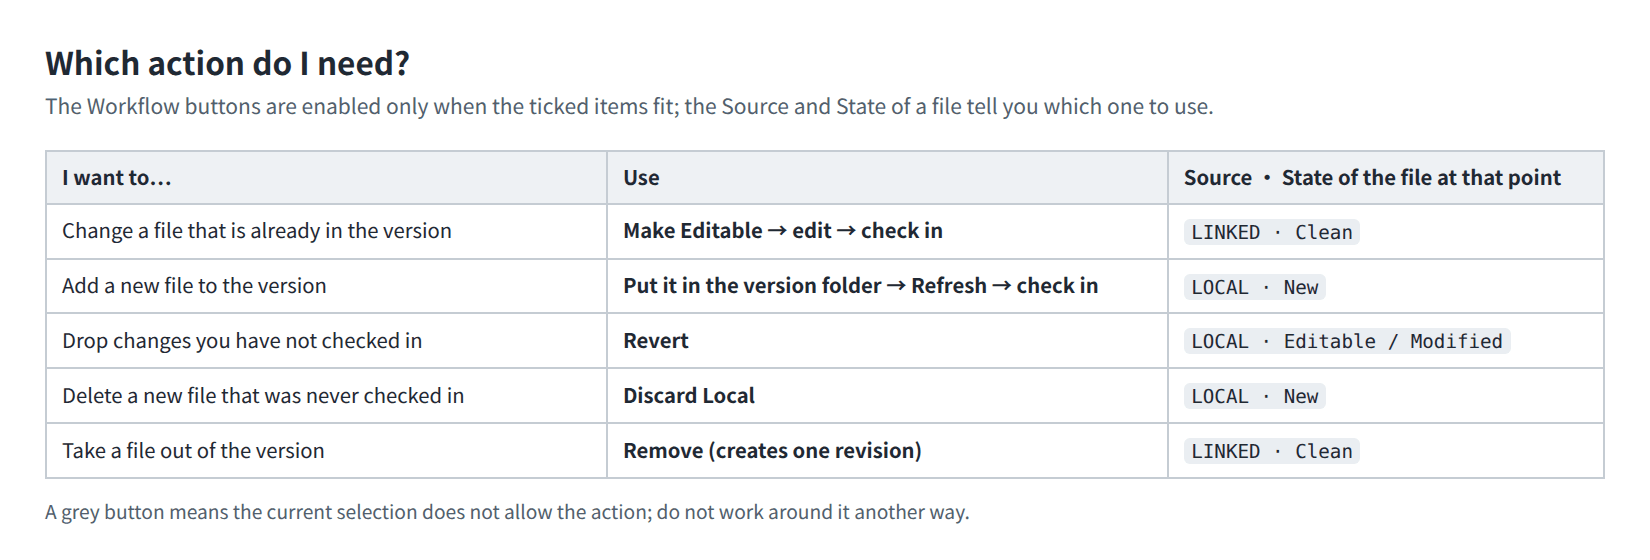
Figure M-02. Choosing the action by what you want to do.
Task 1: Open the GUI
-
Open a terminal and go to your workspace:
cd <WORKSPACE_ROOT> -
Start the GUI:
isvn-gui # project installer (source the environment file from the PM first) ~/.local/opt/isvn/current/isvn-gui # Portable evaluation build -
When the window opens, it shows the Work page. When the workspace does not contain any version yet, the screen looks like Figure U-06.
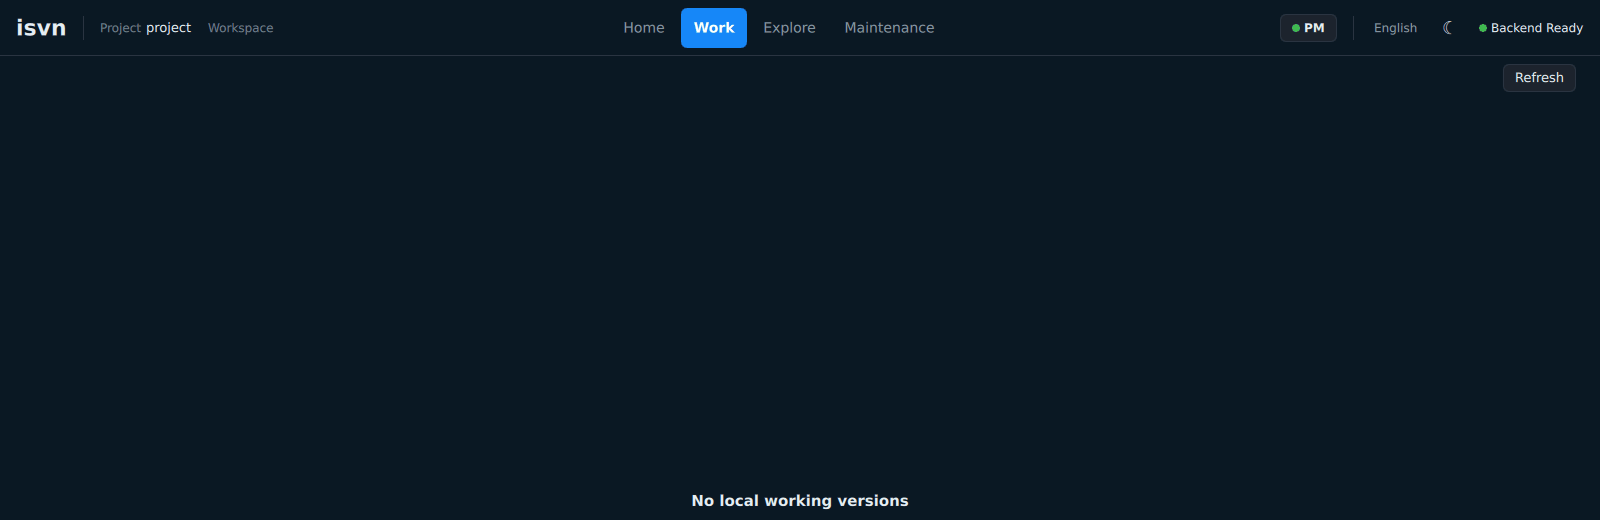
Figure U-06. The GUI on first start: the Work page with no version in the workspace yet.
- The GUI determines the project from the directory it is started in; one window handles only one project.
- The GUI starts in Traditional Chinese with the dark theme. The language button at the top right switches in the order Traditional Chinese → Simplified Chinese → English; the button next to it switches between the dark and light themes.
- Starting the GUI again does not open a second window; the existing window comes to the front.
Task 2: Get a version and start working on it
To work on a version, first check it out into the workspace, then make it the active version.
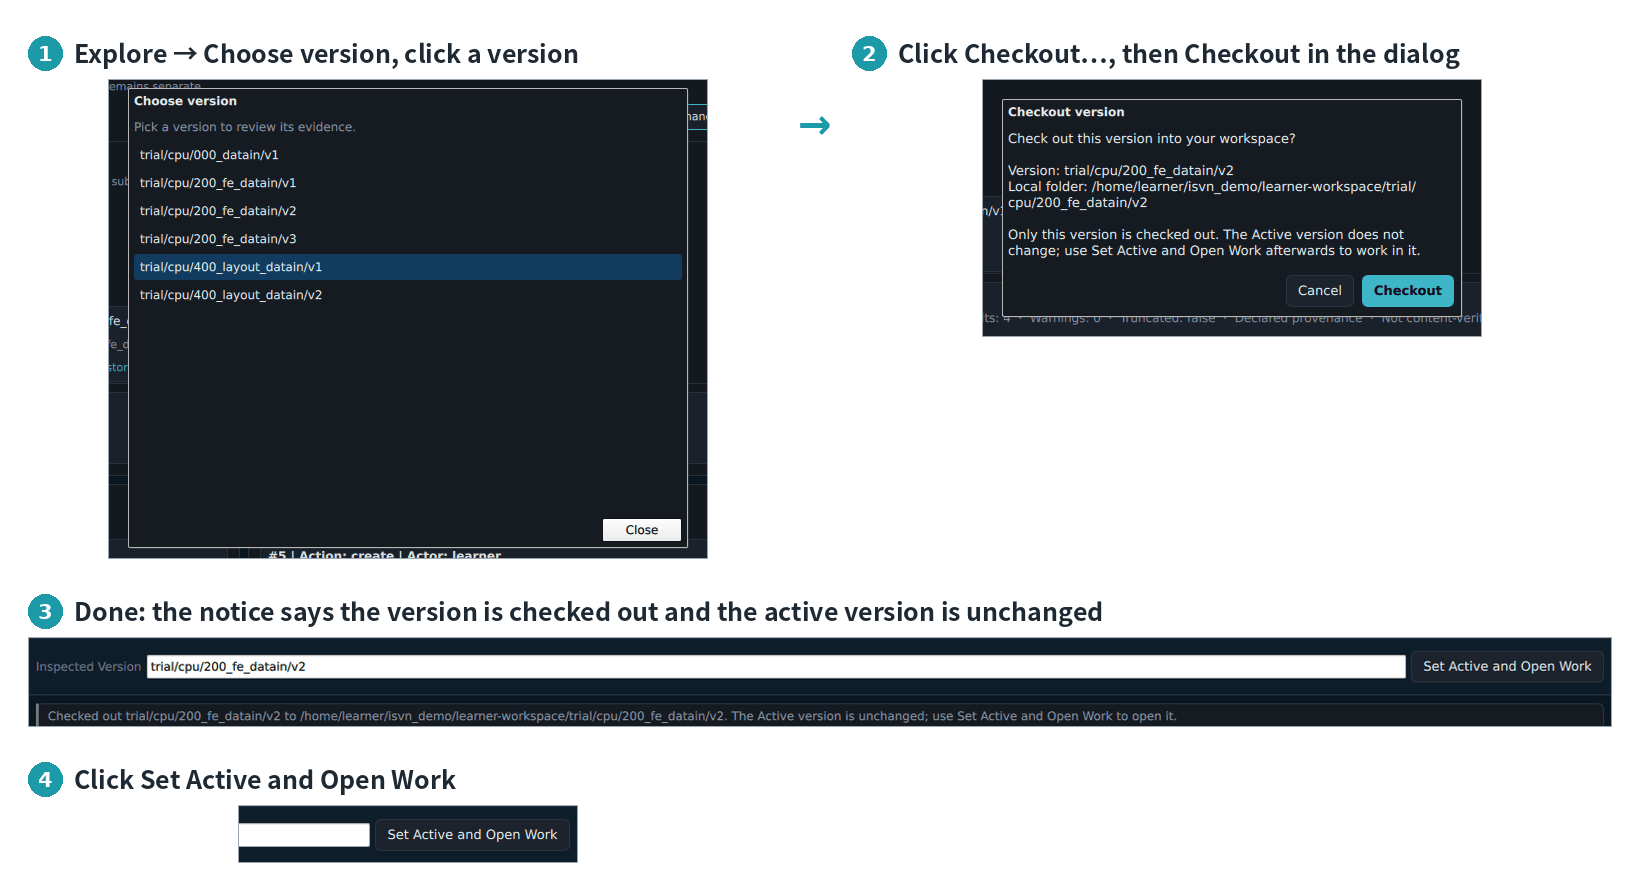
Figure M-03. Getting a version and making it the Active version.
- Click Explore at the top, then click Choose version.
- Click the version you want in the list. Inspected Version at the top shows it, and the message below says "This version is not in this workspace."
- Click Checkout… at the top right. The dialog lists the version and the local folder that will be created; click Checkout.
- When it finishes, a message says the version has been checked out and that the active version has not changed.
- Click Set Active and Open Work. The screen switches to the Work page, and the page header shows this version.
You can also get the version from a terminal; then go back to the GUI, click Refresh, and click the version in Local Working Versions on the left of the Work page:
cd <WORKSPACE_ROOT>
isvn checkout trial/cpu/200_fe_datain/v2
Things to know:
- Checkout gets one version at a time; it does not bring along the files of upstream versions.
- After you get a version, all of its files are LINKED.
- When the version is already in the workspace, selecting it shows "This version is checked out in this workspace."; just click Set Active and Open Work.
Task 3: Understand the Work page
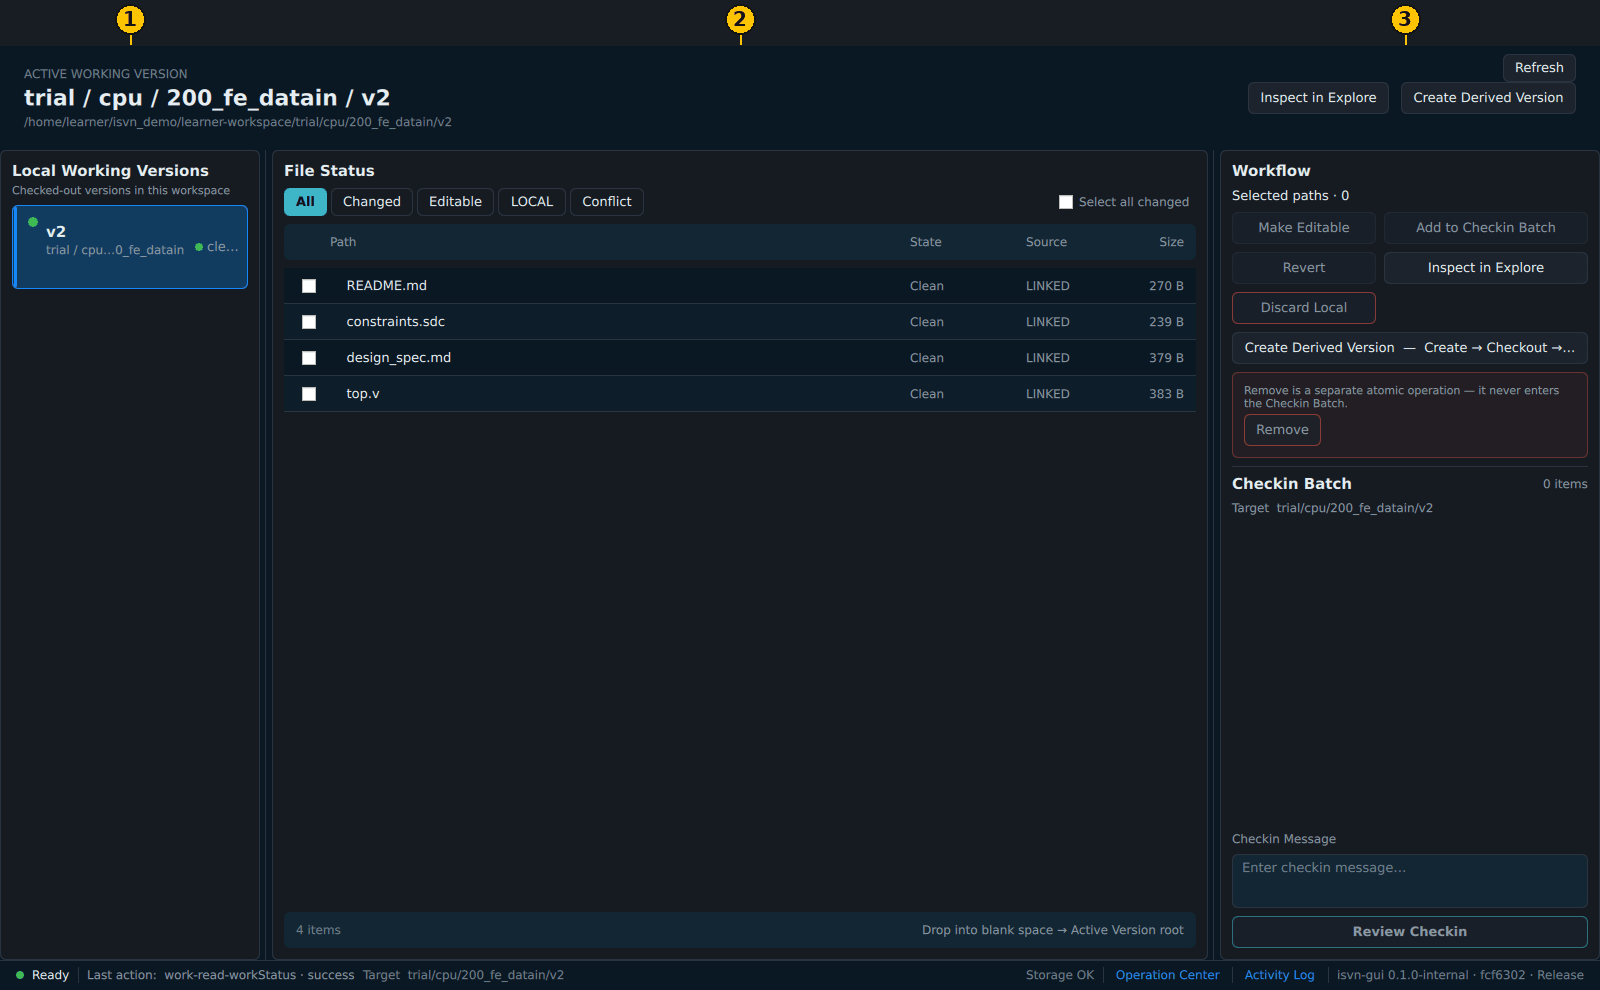
Figure U-10. The three areas of the Work page: ① Local Working Versions ② File Status ③ Workflow.
| Area | Contents |
|---|---|
| ① Local Working Versions | The versions already checked out into this workspace. Click one of them and it becomes the active version |
| ② File Status | The files of the active version: path, status, source (LINKED / LOCAL), size. The box at the front of each row is for ticking |
| ③ Workflow | The actions to run on the ticked items, plus Checkin Batch and Checkin Message |
- Every action handles only the items you have ticked.
- The filters above File Status (All, Changed, Editable, LOCAL, Conflict) change only what is shown, not what is ticked.
- After you change files outside the GUI (an editor, an EDA tool,
cp), click Refresh at the top right to update the screen. - A grey button means the action is not possible for the current selection.
Task 4: Modify a file that is already in the version
A LINKED file points to shared read-only content and cannot be overwritten directly. First make it editable:
- Tick the file in File Status.
- Click Make Editable. The confirmation screen shows "Converts managed files to editable local copies. No repository revision is created." This screen does not list file names, so check the ticked items before you click.
- Click Apply, then click Done.
- The file's status changes to Editable, and its source changes to LOCAL.
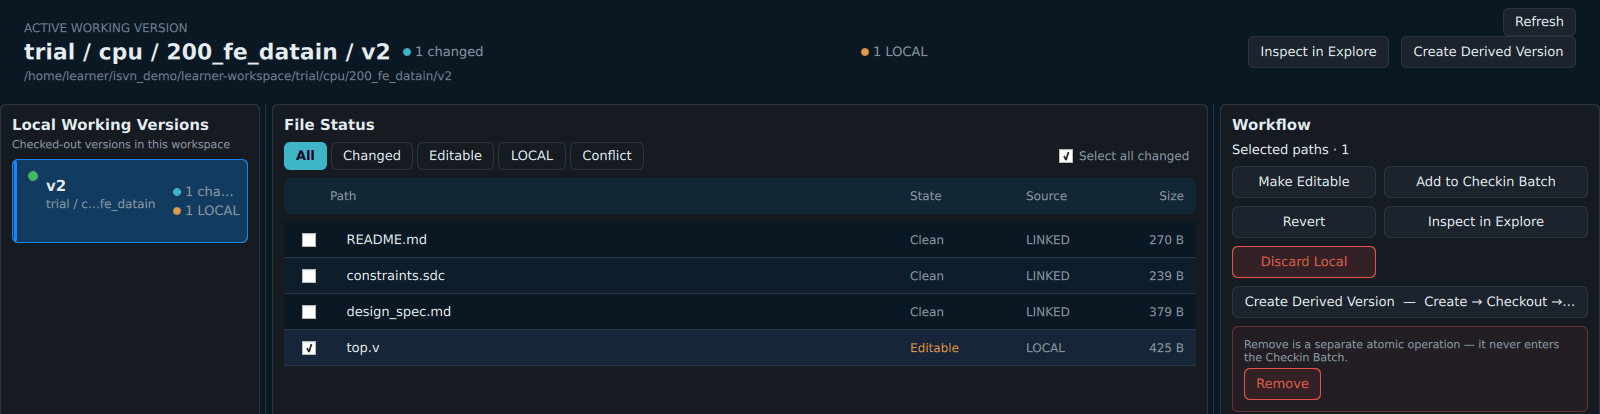
Figure U-13. After Make Editable: top.v is Editable and its source is LOCAL.
- Modify the file with your usual editor or EDA tool (it is in the version folder).
- Go back to the GUI and click Refresh. The file's status changes to Modified.
- Check it in (task 6).
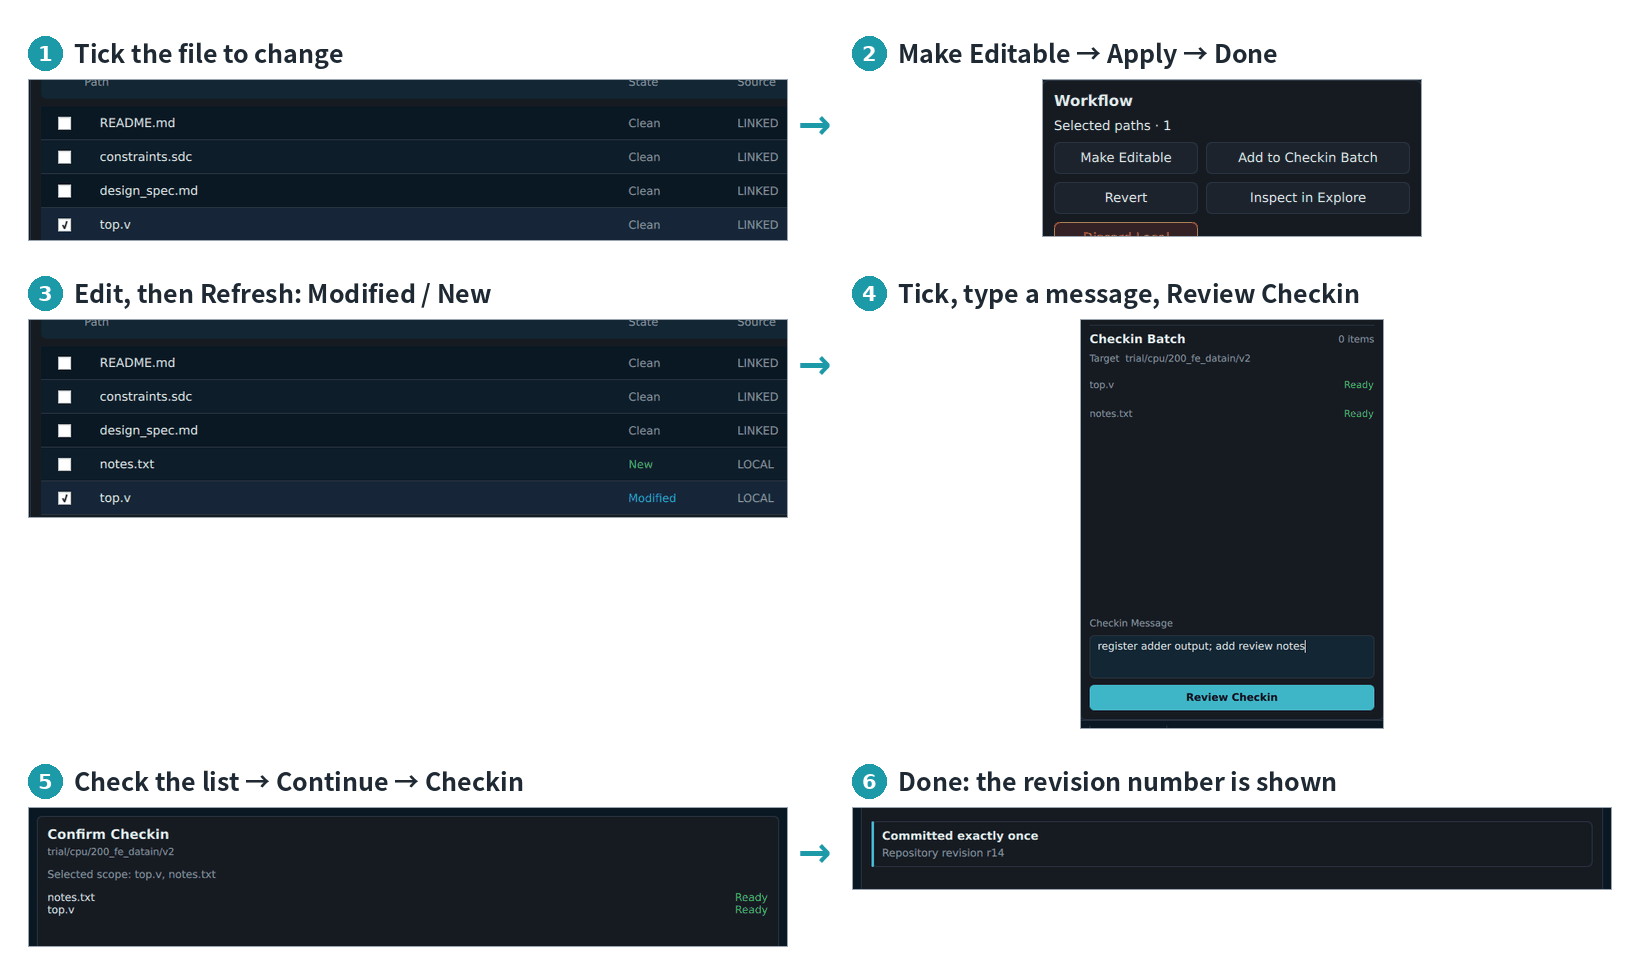
Figure M-04. Changing a managed file and checking it in.
- The shared content is not modified; files of other people or other versions that link to the same content are not affected.
- You can tick several files and make them editable together. Folders cannot be made editable.
- Do not make a file LOCAL in any other way (for example by copying a file over it, or with
isvn edit); such files are blocked at check-in (task 6).
Task 5: Add new files to the version
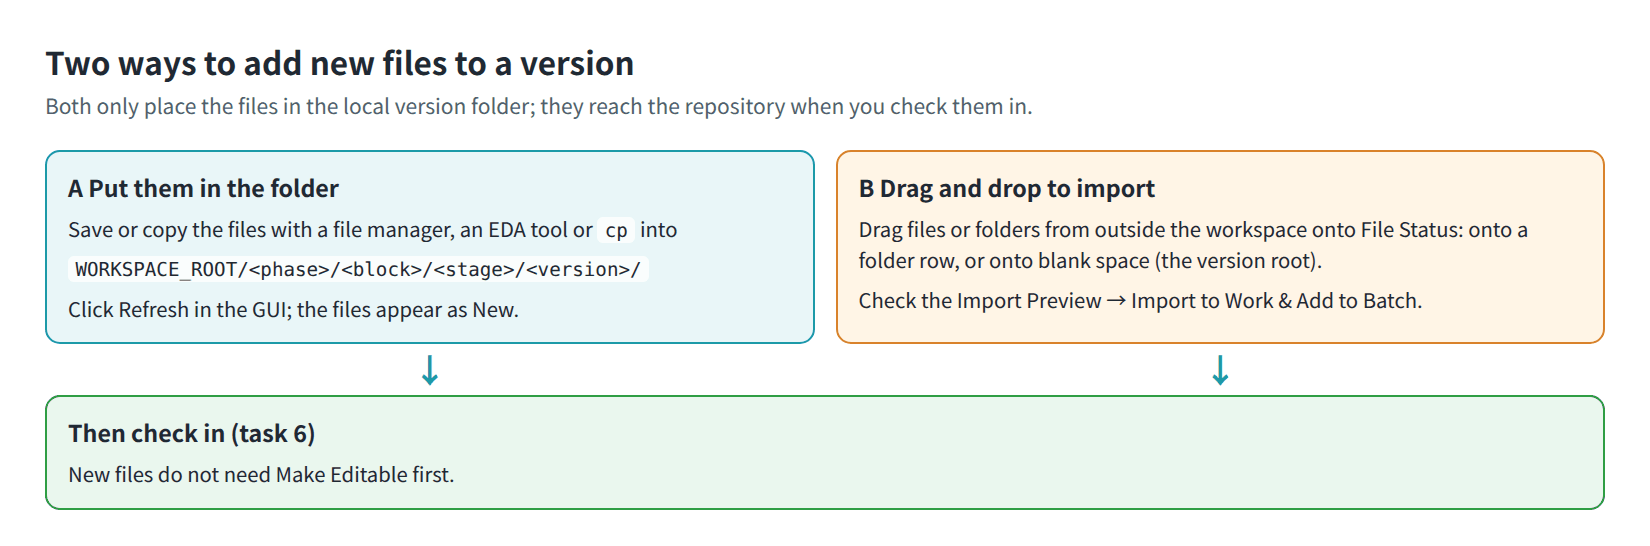
Figure M-05. Two ways to add new files to a version.
Method A: put the files straight into the version folder. Save the files into the version folder with a file manager, an EDA tool or cp, then go back to the GUI and click Refresh. The files appear as New and LOCAL.
Method B: drag and drop to import. Drag files or folders from outside the workspace into File Status:
- Drop onto a folder's row and the destination is that folder; drop onto blank space and the destination is the root of the version.
- Dropping only starts a preview. Import Preview lists the destination path and size of every file.
- Click Import to Work & Add to Batch; copying starts after you confirm. The imported files are added to the check-in batch automatically.
Both methods are only local copies and are not in the repository yet; next you need to check them in (task 6). New files do not need to be made editable first.
Rules for import: if the source contains a symlink or a special file, the whole import is rejected; managed files cannot be overwritten; empty folders are not imported.
Task 6: Check in
- In File Status, tick the files to commit (modified or new ones). They appear in Checkin Batch on the right, marked Ready.
- Enter a description in Checkin Message (required).
- Click Review Checkin. Checkin Batch Review lists exactly what this check-in will commit; the backend has already skipped items with no changes.
- Check the list and click Continue.
- Confirm Checkin shows the list and the message once more. Click Checkin.
- The result screen shows Checkin complete, Committed exactly once and the revision number (for example "Repository revision r14"). Click Close.
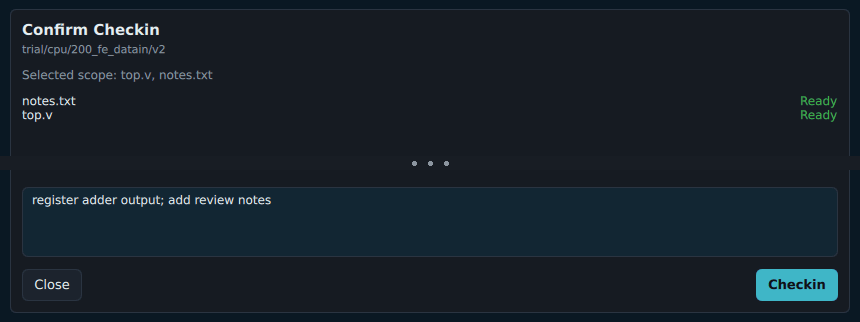
Figure U-16. Batch check-in, step two: Confirm Checkin shows the list and the message (empty areas are left out).
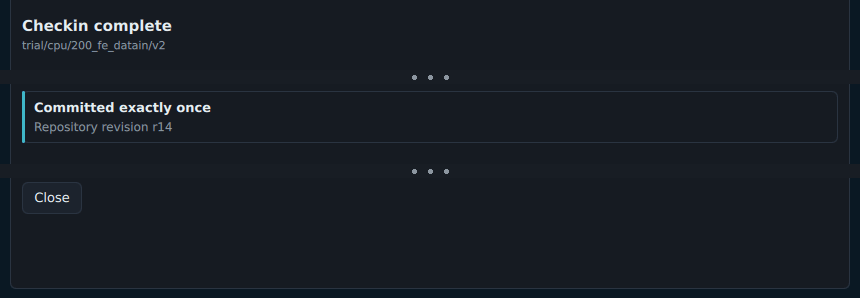
Figure U-17. Result of a batch check-in: Checkin complete and the revision number (empty areas are left out).
After the check-in:
- The committed files are back to LINKED and Clean.
- One check-in creates exactly one revision; there is no "partial success".
- Only the items you ticked are committed; other changes stay where they are.
- If files change after the preview, the run is blocked; click Review Checkin again.
- When an item cannot be committed, Checkin Batch Review shows Checkin is blocked and the reason, and Continue cannot be clicked.
Task 7: Discard changes that are not checked in yet
Revert (managed files that have been made editable or modified):
- Tick the files and click Revert.
- The confirmation screen warns "This discards local changes". To keep your changes, click Cancel; only when you are sure you want to discard them, click Apply, then Done.
- The files are back to Clean and LINKED.
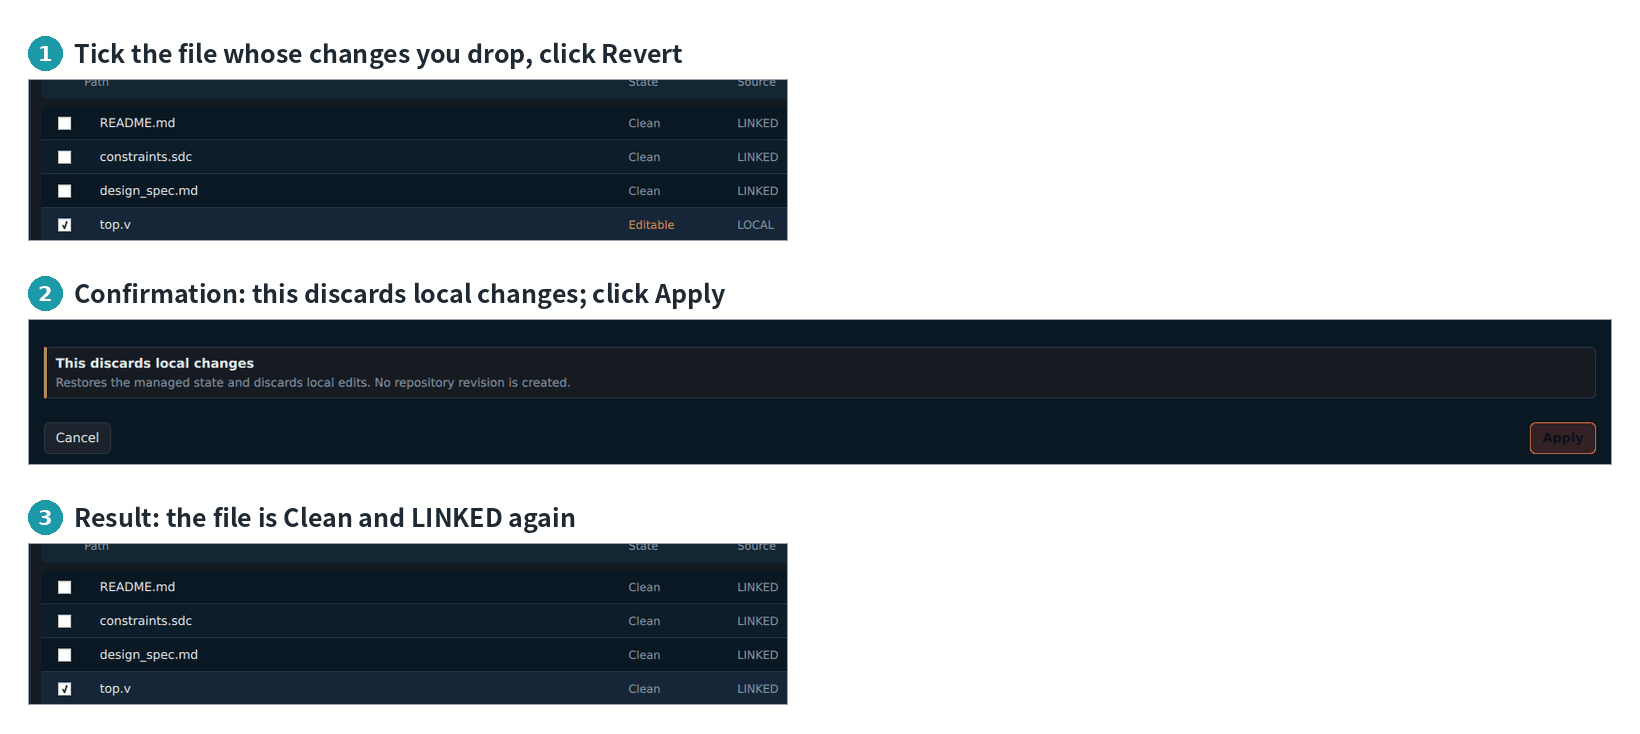
Figure M-07. Revert: dropping the local changes of a file.
Discard Local (new files that have never been checked in): tick the New files, click Discard Local and confirm. This deletes the local files and cannot be undone.
Neither action creates a repository revision.
Task 8: Remove files from the version
- Tick the managed files or folders to remove, and click Remove inside the red box in Workflow.
- The Remove from Version confirmation screen does not list file names, so check the ticked items before you click.
- Enter the Removal Message (required). When the items have local changes, you must also confirm separately that you discard those changes.
- Click Remove at the bottom right. The result shows Completed and the revision number; click Done.
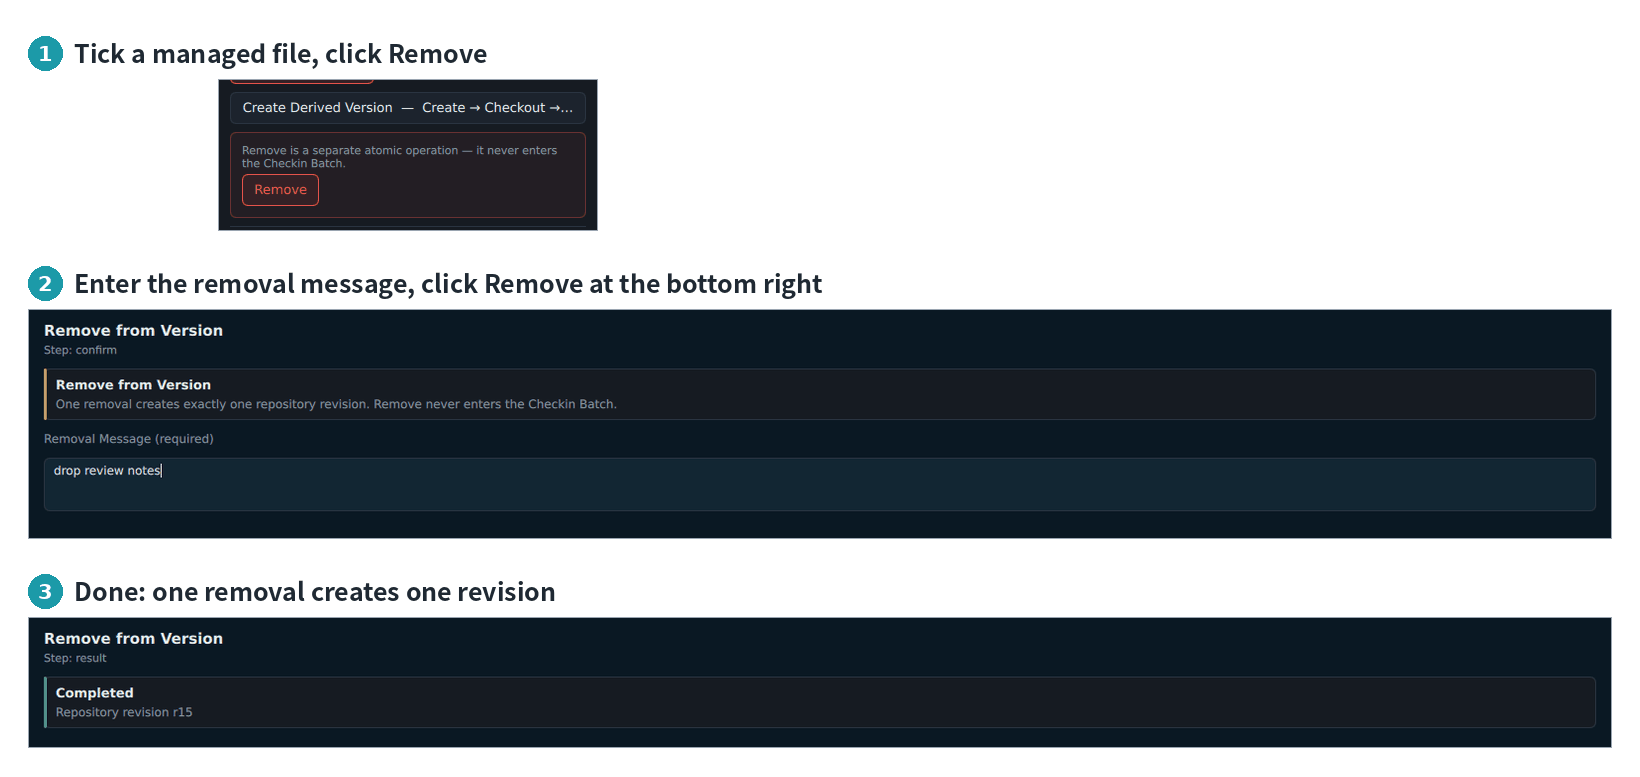
Figure M-06. Removing a file from the version.
- One removal creates one revision. Removals do not go into the check-in batch.
- New files that have never been checked in cannot be removed with Remove; use Discard Local.
- Remove removes files from the version, not the whole version.
Task 9: Open a new version with the current version as upstream
In the GUI:
- Make sure the active version is the one you want as the upstream.
- Click Create Derived Version.
- The confirmation dialog has two buttons: Cancel and Create → Checkout → Set Active (Figure U-22).
- Click Create → Checkout → Set Active. When it finishes, the new version is the active version.
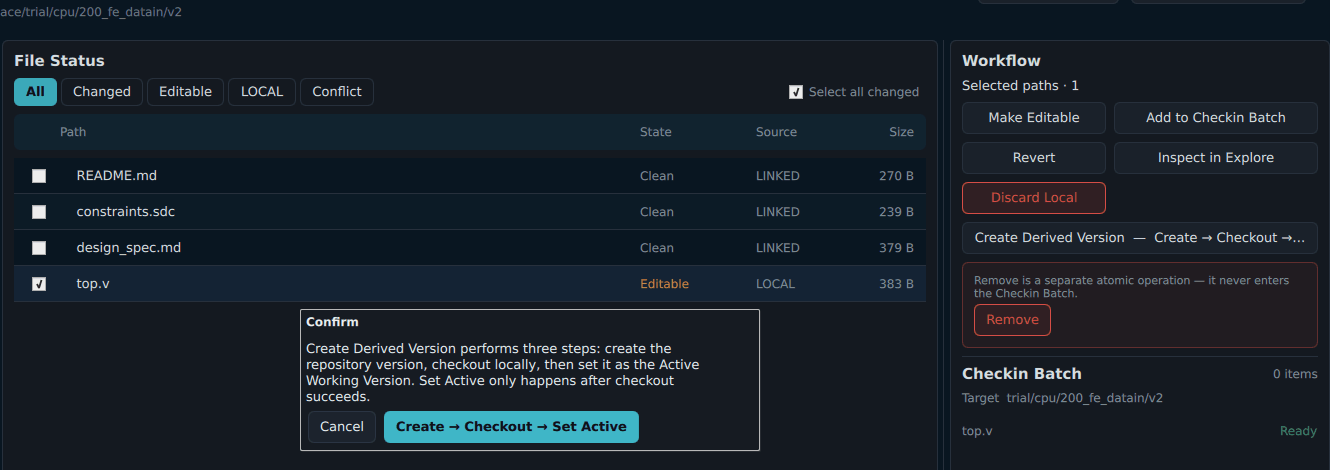
Figure U-22. The confirmation dialog of Create Derived Version.
- The name of the new version is always the ID of the active version plus
.d, for exampletrial/cpu/200_fe_datain/v2.d; it cannot be renamed in the GUI. If a version with the same name already exists, the creation fails and nothing is changed. - The new version contains all the files of the upstream from the start.
To choose your own name, use the CLI:
cd <WORKSPACE_ROOT>
isvn create trial/cpu/200_fe_datain/v3 --parent trial/cpu/200_fe_datain/v2
When it finishes it prints created <new version> from <upstream version>, and the new version is also checked out into the workspace. Go back to the GUI, click Refresh, and click the new version in the Local Working Versions list.
Task 10: Find out where a version or file comes from
The upstream of a version:
- On the Explore page, click Choose version and click the version.
- In the Query Panel on the left of Lineage & Evidence Explorer: set the mode to Version Lineage and the query type to Ancestor Chain.
- Click Run Lineage Query. The lineage graph is drawn from the earliest version to this version; click a node and the Node Inspector on the right shows its details.
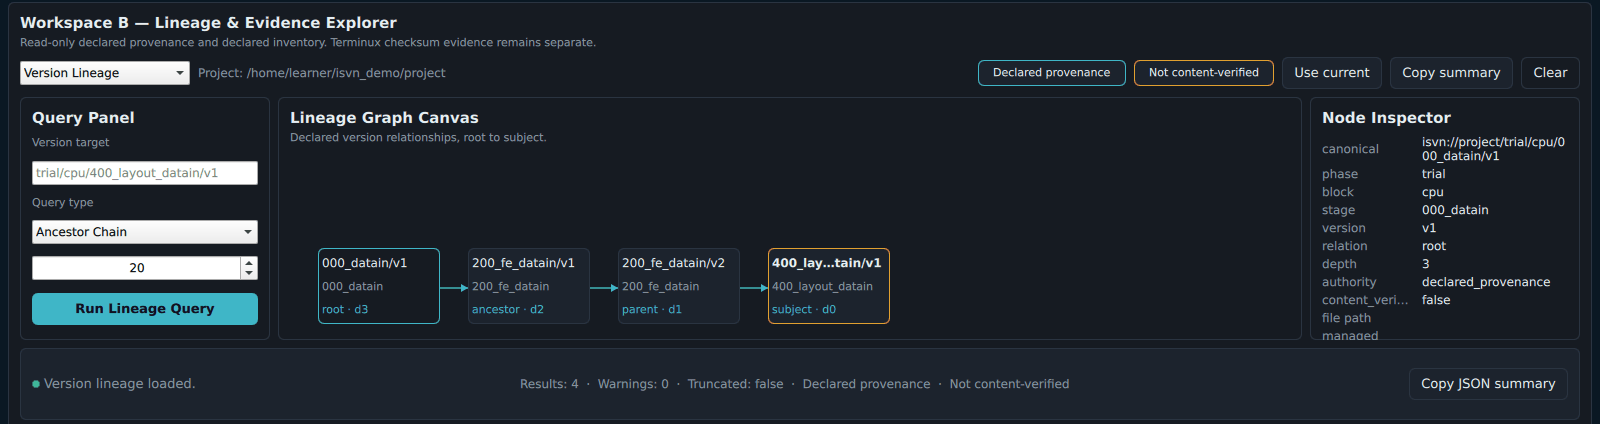
Figure U-24. Result of a version lineage query (Ancestor Chain): the lineage graph and the Node Inspector.
Which versions a file appears in:
- Change the mode of the Query Panel to File Lineage.
- In File path, enter the path relative to the version root, for example
top.v; set the query type to Versions. - Click Run File Query.
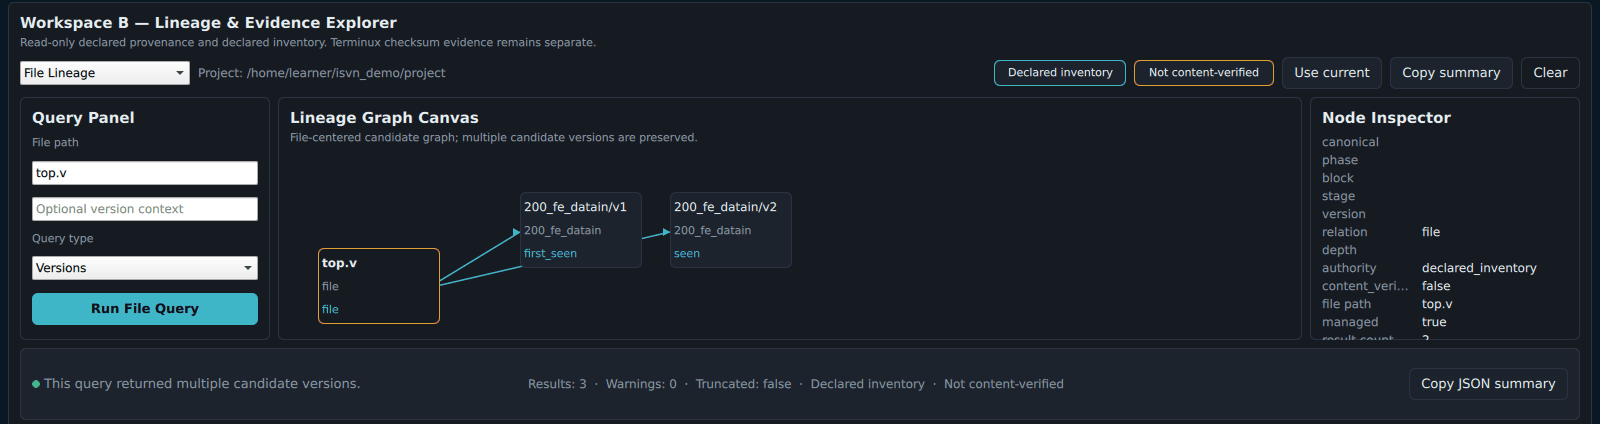
Figure U-25. Result of a file lineage query (Versions): top.v is found in the two versions checked out locally.
When you read the results:
- Lineage is the upstream that the user registered when creating the version; it is not derived from file contents. Declared provenance and Not content-verified on the screen are reminders of this.
- File lineage sees only the versions already checked out into your workspace. For a more complete view, check out other versions first.
You can also query in a terminal (Figure U-27):
isvn ancestry trial/cpu/400_layout_datain/v1
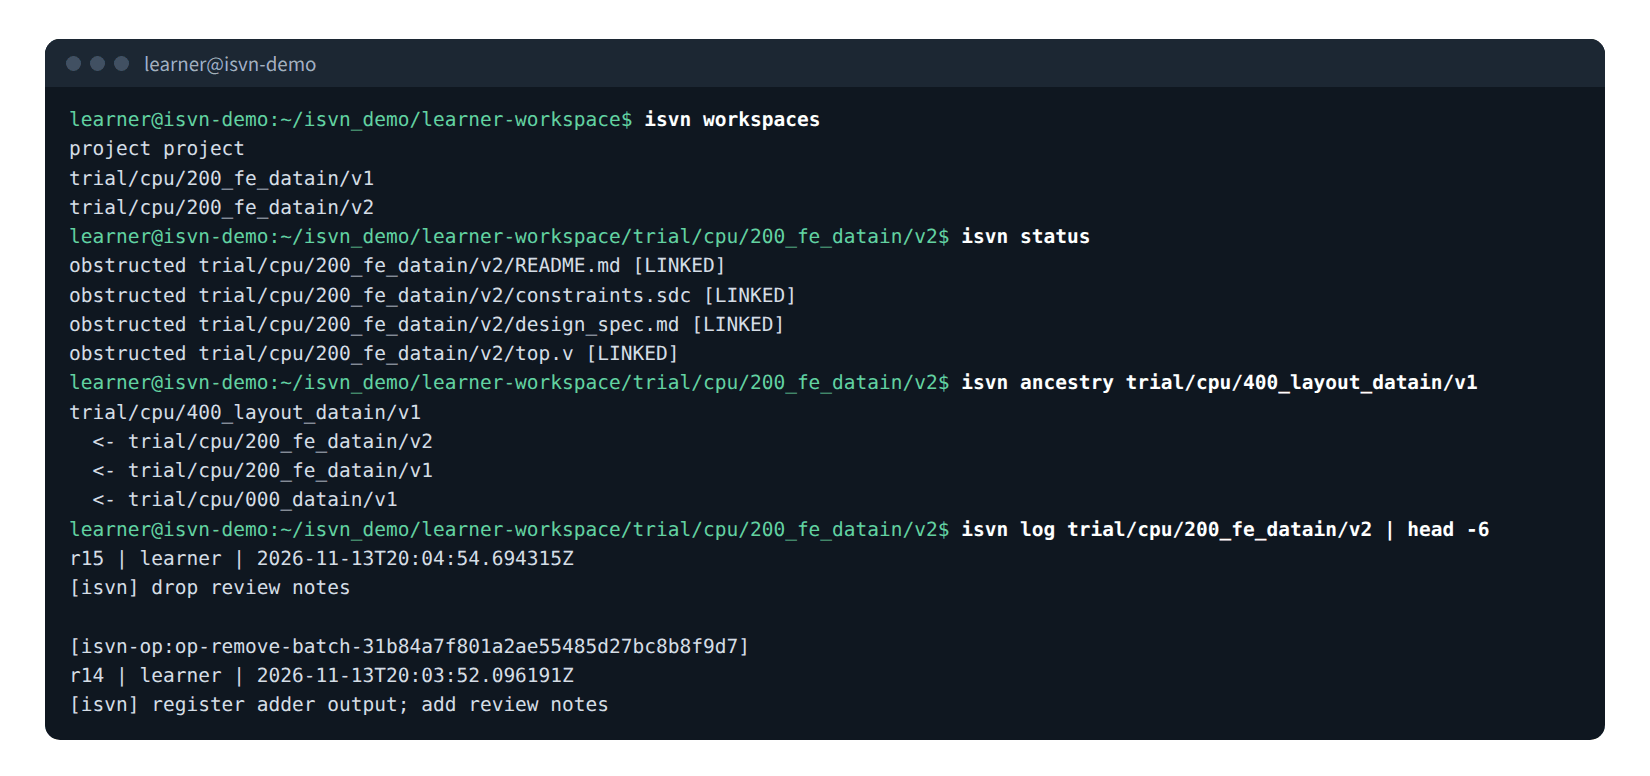
Figure U-27. Real output of isvn workspaces, isvn status, isvn ancestry and isvn log.
Task 11: Confirm the result of an operation
- The status bar at the bottom shows the last action and its result, for example "Last action: work-read-workStatus · success".
- Click Operation Center in the status bar: it lists running and finished operations; click Open to view one.
- Click Activity Log: a summary of the recent operations of this user in this project.
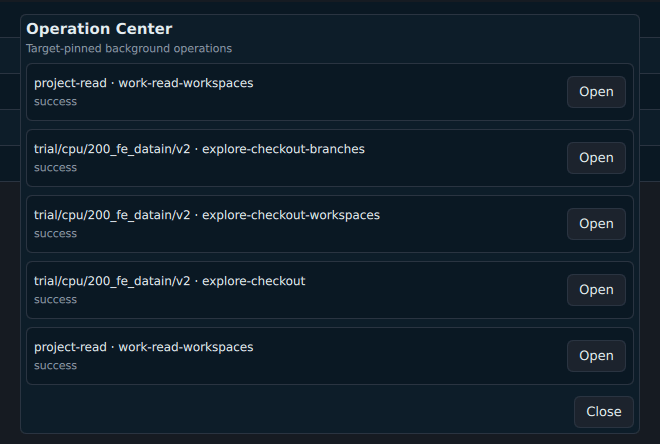
Figure U-32. The Operation Center.
When the result is "outcome unknown" or Recovery Required:
- Do not simply redo the same check-in or removal, so that nothing is committed twice.
- Open that operation in the Operation Center and run only the verification or recovery the screen offers, for example Verify repository history.
- Do not modify
.isvn_local/in the workspace by hand.
Task 12: Switch between versions
- Click another version in Local Working Versions on the left of the Work page, and it becomes the active version.
- Each version keeps its own ticks, check-in message and content not yet submitted, so nothing gets mixed up when you switch.
- While an operation on one version is still running, you can switch to another version and keep working; the original version shows "operation running".
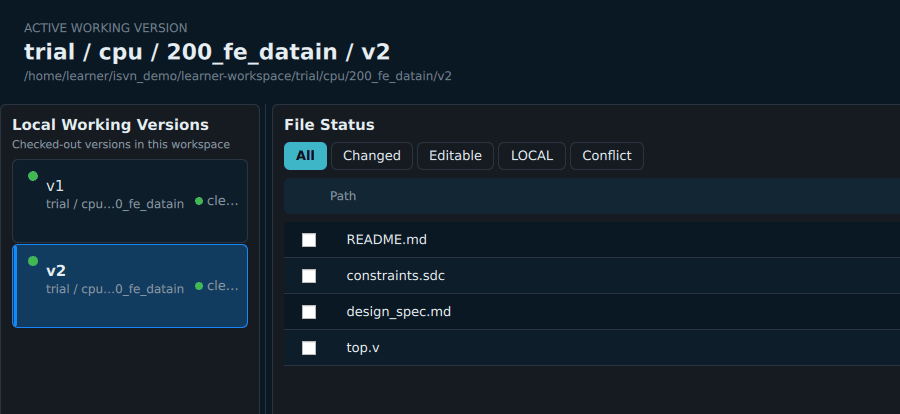
Figure U-31. The Local Working Versions list with two versions in the workspace; the highlighted one is active.
Task 13: Close the GUI
- When no operation is running, just close the window.
- When an operation is running, three choices appear: Run in Background (hides the window; the operation continues), Return to Operations (does not close), Force Exit (stops the running process; recovery is not guaranteed). Normally choose Run in Background or Return to Operations.
- After you choose Run in Background, starting the GUI again brings back the original window.
Task 14: Do the same work with commands
When you need a script, every GUI action has a matching command. To modify and check in one file:
cd <WORKSPACE_ROOT>
V=trial/cpu/200_fe_datain/v2
plan_of() { python3 -c 'import json,sys; print(json.load(sys.stdin)["plan_hash"])'; }

plan=$(isvn work-local-op preview --action make-editable --in $V --path constraints.sdc --json | plan_of)
isvn work-local-op apply --action make-editable --in $V --path constraints.sdc --expected-plan "$plan" --json

echo "# tighter clock" >> $V/constraints.sdc

plan=$(isvn checkin-batch preview $V --path constraints.sdc --json | plan_of)
isvn checkin-batch apply $V --path constraints.sdc --expected-plan "$plan" --message "tighten clock constraint" --json
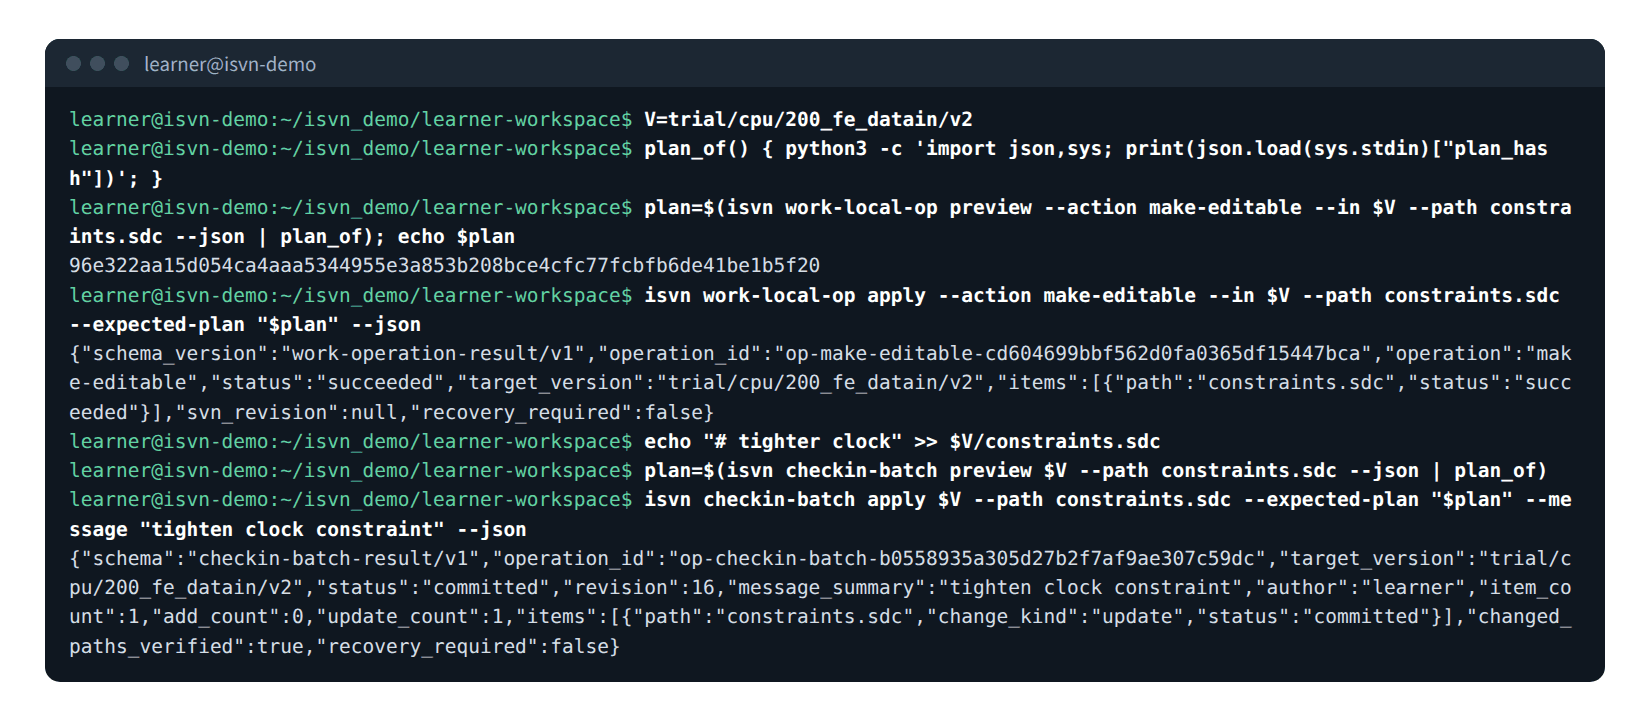
Figure U-34. Real output of editing and checking in a managed file with the batch commands.
| GUI | Command |
|---|---|
| Make Editable / Revert / Discard Local | isvn work-local-op preview|apply --action make-editable|revert|discard-local --in <version> --path <path> |
| Checkin | isvn checkin-batch preview|apply <version> --path <path> [--expected-plan <hash>] [--message <message>] |
| Remove | isvn remove-batch preview|apply --from <version> --path <path> [--expected-plan <hash>] [--message <message>] |
| Checkout | isvn checkout <version> |
| Create Derived Version | isvn create <new version> --parent <upstream version> |
- Scripts must check
statusin the output JSON, not just the exit code. - A single file or a whole folder can also be committed with
isvn checkin <path>; new files inside the folder are committed with it; when nothing has changed, the command says so and commits nothing. For details, see section 19.2 of the reference isvn User Guide of the reference isvn User Guide.
Task 15: When something goes wrong
| What you see | Cause | What to do |
|---|---|---|
| A button is grey | The ticked items are not suitable for this action | See Figure M-02 to choose the right action; do not bypass it |
| You changed a file but the screen did not change | The GUI does not detect changes made outside the GUI automatically | Click Refresh |
| Writing is refused when you modify a LINKED file directly | A LINKED file is read-only shared content | First Make Editable (task 4) |
| A run is blocked and asks you to preview again | The files or the repository changed after the preview | Click Review Checkin again, or run the action again |
| The result is "outcome unknown" | The commit was interrupted | Click Verify repository history in the Operation Center; do not simply retry (task 11) |
When you report a problem, provide: the output of isvn version, the version ID, the operation ID from the Operation Center, and the reason code and revision number shown on the screen.
Appendix: quick reference
| I want to… | GUI steps |
|---|---|
| Get a version | Explore → Choose version → Checkout… → Checkout |
| Start working on it | Explore → Set Active and Open Work; or click it in Local Working Versions on the Work page |
| Modify a managed file | Tick → Make Editable → Apply → Done → modify → Refresh |
| Add new files | Put them in the version folder → Refresh; or drag and drop → Import Preview → Import to Work & Add to Batch |
| Check in | Tick → Checkin Message → Review Checkin → Continue → Checkin |
| Discard changes | Tick → Revert → Apply → Done |
| Delete a new file that was never checked in | Tick → Discard Local |
| Remove from the version | Tick → Remove → Removal Message → Remove → Done |
| Open a new version | Create Derived Version → Create → Checkout → Set Active |
| Find the upstream of a version | Explore → Version Lineage → Ancestor Chain → Run Lineage Query |
| Find which versions a file is in | Explore → File Lineage → File path → Run File Query |
| See the result of an operation | Status bar → Operation Center / Activity Log |